Made and counted by Wren —

Crochet baby Converse sneakers pattern with sole and tongue

3.0mm-4.0mm hook, worsted cotton or baby acrylic: crochet baby Converse sneakers with sole, body, tongue, and laces.

Crochet baby Converse sneakers pattern with sole and tongue
IntermediateLevel
4-6 hoursTime
3.0 mmHook
WorstedYarn
Jump to the pattern

About this pattern

This is a two-color, two-piece baby shoe: a 3-round oval sole worked from a chain of 11, topped with a 2-round body picked up in back loops only, plus a separate crocheted tongue, laces, eyelets, and a star detail. It takes a 3.0mm to 4.0mm hook, cotton or baby acrylic yarn in a sole color and a body color, a yarn needle, scissors, and stitch markers. Expect roughly 4 to 6 hours per pair including finishing.

A two-piece baby shoe worked flat-to-round: the sole starts as a chain of 11 and builds outward for 3 rounds before the body picks up in back loops only for 2 rounds to raise the sides. A separate tongue is added afterward in short straight rows, then laces and eyelets and a star finish the Converse look. The number that matters most is the 3-round sole — get that flat and the rest of the shoe sits square on the foot.

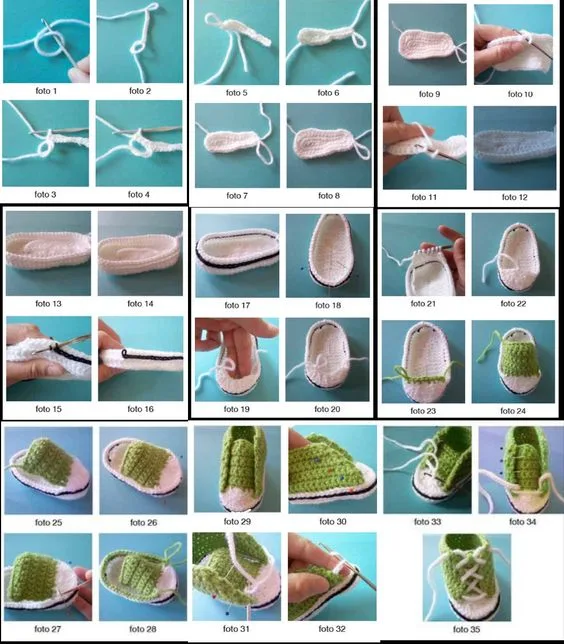
The pattern

Written out round by round

Materials

Yarn

  • Soft, lightweight yarn such as cotton or baby acrylic yarn in two colors—one for the shoe body and one for the sole. Choose white for the soles and a contrasting color for the shoe body to mimic the classic Converse look.

Crochet Hook

  • A 3.0mm to 4.0mm hook is ideal for this project, depending on your yarn weight.

Yarn Needle

  • For sewing pieces together and weaving in ends.

Scissors

  • To trim the yarn.

Stitch Markers

  • To help you keep track of your rounds.

Abbreviations

  • sc = single crochet
  • sc2tog = single crochet 2 stitches together (decrease)

Sole of the Shoe

Foundation Chain: Chain 11.

Round 1SC in the second chain from the hook and across the chain. In the last chain, make 3 SC to round the corner and continue SC down the opposite side of the chain. Slip stitch to join.
Round 2Chain 1, 2 SC in the first stitch, SC across until the corner, then make 2 SC in each of the next 3 stitches. SC across the opposite side, 2 SC in the last stitch, and slip stitch to join.
Round 3Chain 1, 1 SC in the next stitch, 2 SC in the next ; repeat around. Slip stitch to join and fasten off.

"You can adjust the sole size by increasing the chain or adding extra rounds for larger baby feet."

Body of the Shoe

Attaching the Yarn: Join the contrasting yarn color to the sole of the shoe with a slip stitch.

Round 1Chain 1 and SC in the back loops only around the entire sole. This will create a sharp edge between the sole and the body of the shoe.
Round 2Continue with SC stitches around for 2 more rounds to build the height of the shoe.Toe Shape: For the front of the shoe, use SC decreases (SC2tog) in the middle stitches to form a rounded toe.

Tongue of the Shoe

Start the Tongue: Attach yarn at the center of the shoe's toe section and SC in a straight line (about 6 stitches) to form the base of the tongue.

Work in Rows: Chain 1 and turn. Continue SC for 4 to 5 rows to form the tongue of the sneaker.

Laces and Eyelets

Eyelets: Crochet small chains on both sides of the shoe where the laces will go. Space them evenly along the top sides of the shoe.

Laces: Use a piece of white yarn (or any contrasting color) to thread through the eyelets, just like real Converse sneakers. You can make your laces longer to tie a bow.

Adding the Converse Star

Star Patch: For an authentic look, crochet a small circle in white yarn and embroider or crochet a tiny star in the center using the body color yarn.

Attach: Sew the patch to the outer side of each sneaker.

Tester's notes

1: use the same 3.0mm to 4.0mm hook throughout the sole and body so the back-loop pickup in Round 1 of the body sits flush against the sole edge.

3: mark the start of each of the 3 sole rounds and the 2 body rounds with a stitch marker, since both pieces are worked in continuous rounds with a slip-stitch join, not spirals.

Keep tension even across the sole's 3 rounds — a tight Round 3 will pull the flat oval into a cup shape before the body is even attached.

Join the contrasting body color with a slip stitch exactly where the sole's Round 3 fastens off, so the color break sits at the heel rather than mid-toe.

No stuffing is called for in this pattern; the shoe holds its shape from the back-loop ridge and 2 rounds of body stitches, not from fiberfill.

Work in progress

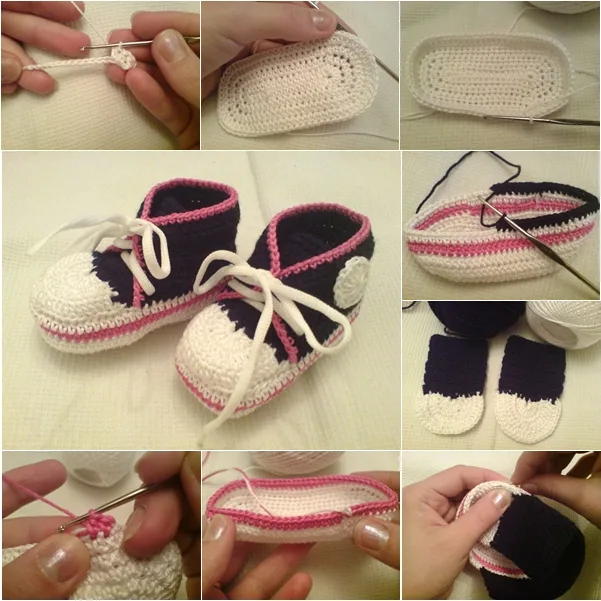
Crochet baby Converse sneakers pattern with sole and tongue — photo 2
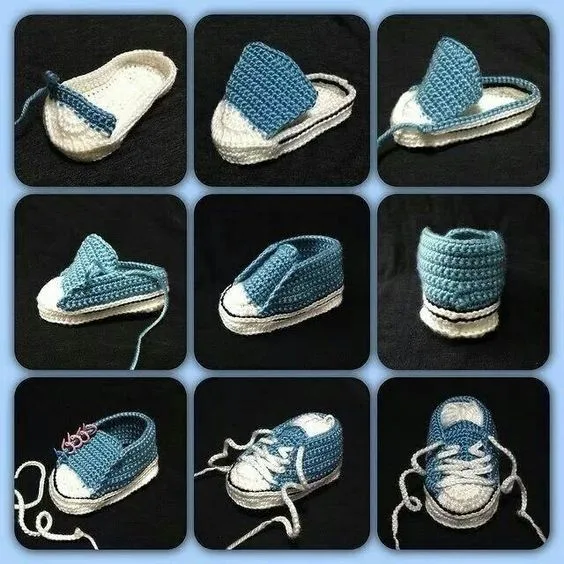
Crochet baby Converse sneakers pattern with sole and tongue — photo 3
Crochet baby Converse sneakers pattern with sole and tongue — photo 4

At a glance

Rounds5
Parts5
LevelIntermediate
Time4-6 hours
Hook3.0 mm
YarnWorsted

Gauge check

After Round 1 of the sole, count stitches around the corner sections — the pattern calls for 3 SC in the last chain on the first pass, so check that both curved ends match before Round 2 doubles them.

If something looks wrong

the sole cups instead of lying flat
Stitches are too tight across the 3 rounds, or the corner increases (2 SC in each of the 3 corner stitches in Round 2) were skipped. Rework Round 2 or 3 with a slightly larger hook and confirm the corner increases are present.
the body doesn't sit flush against the sole edge
Round 1 of the body was worked into both loops instead of back loops only. Frog the round and re-pick-up in back loops only to get the sharp edge the pattern describes.
the toe doesn't round off cleanly
SC2tog decreases in the toe shaping step were spaced too far apart or too close together. Center the decreases on the middle stitches of the toe row and space them evenly before fastening off.
the tongue flares or twists
Row count drifted above or below the stated 4 to 5 rows, or the turning chain-1 was skipped on a row. Rip back to the 6-stitch foundation line and re-count rows, keeping the chain-1 turn consistent on every row.

Yarn substitutions

100% cotton, worsted weightHolds the sole's flat shape with less curling and gives crisp stitch definition on the back-loop ridge; use the same 3.0mm to 4.0mm hook range, sizing toward 3.0mm for tighter fabric.
baby acrylic, DK weightProduces a smaller, softer shoe with more drape in the tongue and body rounds; drop to a 3.0mm hook to keep the sole from splaying.
cotton-acrylic blend, worsted weightBalances the crispness of cotton with the softness of acrylic for everyday wear; stays within the pattern's 3.0mm to 4.0mm hook range at either end depending on how firm the sole should be.
FAQs

Questions

Can the sole be made larger for bigger baby feet?

Yes, the pattern itself notes the sole size can be adjusted by increasing the starting chain beyond 11 or by adding extra rounds past the 3 given. Keep the same corner-increase logic in each added round so the oval stays flat.

How many colors are needed for the classic Converse look?

Two: one for the sole (typically white) and a contrasting color for the body of the shoe, per the materials list. The tongue, laces, and star can reuse either color or introduce a third if preferred.

One at a time —

Get the next pattern

Tested round by round before it is sent. No spam.