Made and counted by Wren —

Colorful Fish Amigurumi Keychain Free Crochet Pattern

Make an adorable colorful fish amigurumi keychain with this free crochet pattern featuring easy rounds, cute safety eyes, and a sweet embroidered face.

Colorful Fish Amigurumi Keychain Free Crochet Pattern
IntermediateLevel
4-6 HoursTime
3.0 mmHook
WorstedYarn
Jump to the pattern

At a glance

Start the fish body with a magic ring and begin working single crochets in a continuous spiral round.

Increase gradually over the first several rounds to shape the widest part of the fish's rounded belly.

Work even rounds without increasing to build up the body's depth before starting to taper it.

Decrease steadily in the later rounds to narrow the body toward the tail end.

Pause partway through to insert the oval safety eyes and add a light amount of fiberfill stuffing.

Continue stuffing gradually as you close the remaining rounds until the fish feels firm but soft.

Embroider the pink cheeks and black mouth once the body is complete for a sweet expressive face.

Attach the keychain hardware ring securely at one end so the fish is ready to clip and carry.

About this pattern

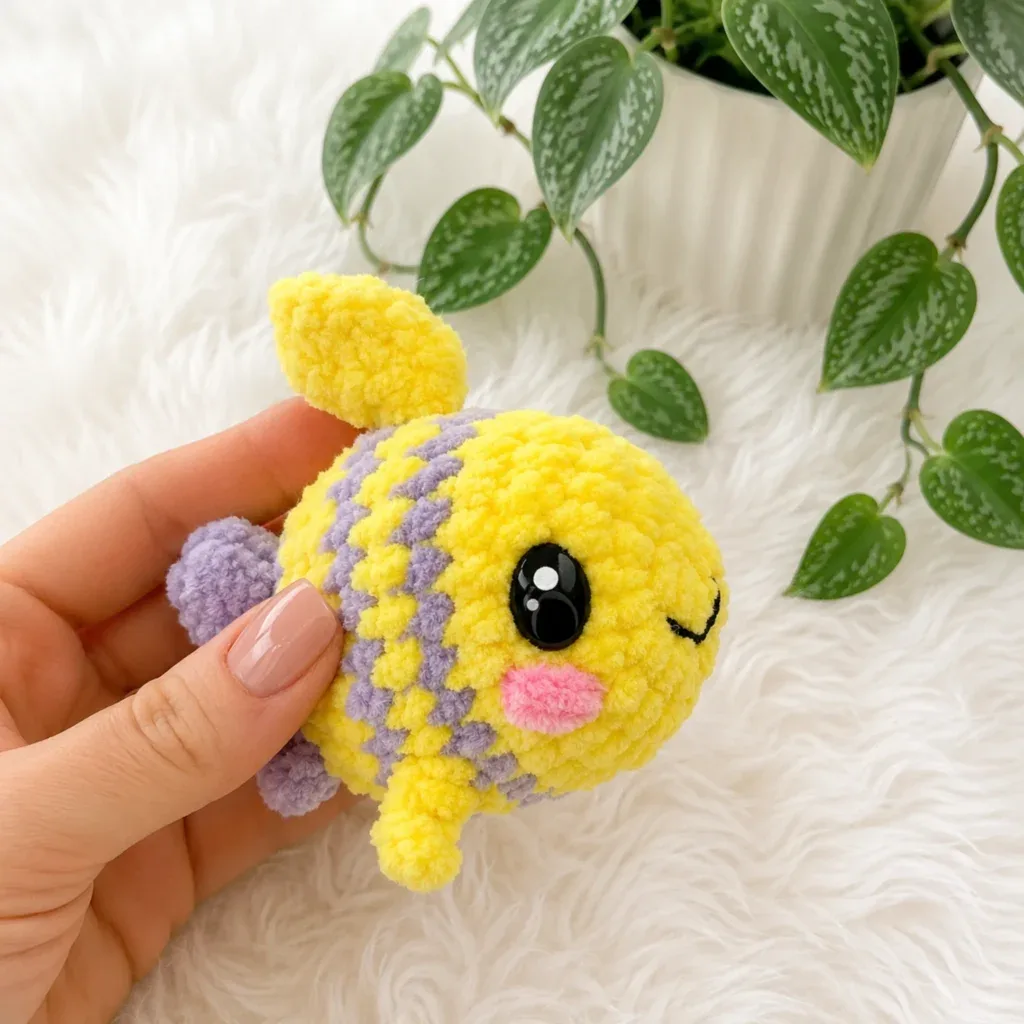
This Colorful Fish Amigurumi Keychain pattern turns a small ball of velvet yarn into the most charming little sea creature you've ever clipped to your keys. Worked up in cheerful colors like yellow, lilac, green, and violet, this tiny fish has a flat, huggable shape and a personality that shines through those glossy oval safety eyes. It's the perfect quick-and-cute project for anyone who loves amigurumi but doesn't want to commit to a week-long project — plus it makes an irresistible party favor or stocking stuffer alternative.

You'll be working entirely in continuous spiral rounds, which means no slip-stitch joins and no visible seams along the body — just smooth, professional-looking results if you keep your stitch marker in place. The techniques here are approachable for confident beginners and a breeze for intermediate crocheters: single crochets, simple increases, and basic shaping give the fish its rounded belly and tapered tail. Expect to spend somewhere between one and two relaxed evenings on a single fish, including stuffing, eye placement, and face embroidery.

When you're finished, you'll have a flat, soft, palm-sized fish measuring around 3 inches (7–8 cm), with a glossy velvet finish that photographs beautifully and feels soft to the touch. Attach the keychain hardware and it instantly becomes a functional accessory — clip it to a backpack, diaper bag, or set of keys for an instant pop of color. These little fish also make wonderful gifts in a rainbow set, so don't be surprised if one becomes an entire school of colorful amigurumi friends.

Variations

The beauty of this pattern is how easily it adapts to your yarn stash and mood! Swap the yellow body for a bold rainbow gradient using self-striping velvet yarn like Bernat Baby Velvet or Comfy Cotton Blend for an ombré fish effect without any color-change fuss. Want a tropical clownfish look? Alternate two rounds of orange with single rounds of white, then add tiny black embroidered stripe outlines for extra definition. For a beachy, pastel school of fish, work each one in a different soft hue — mint, blush, lilac, and buttercream — and clip them all to one keyring for a coordinated set that makes a fantastic party favor bundle. If you'd like a slightly larger fish for a plush toy rather than a keychain, simply size up to a DK or worsted-weight cotton yarn with a 3.5mm hook, which will naturally increase your finished measurements by about 20–30% without changing the round count. Conversely, for a truly tiny charm-sized fish perfect for earrings or bag zipper pulls, try a lighter fingering-weight yarn with a 2.5mm hook. Seasonal fans can lean into themed color palettes — icy blues and silvers for a wintry fish, or warm oranges and browns for an autumn-inspired swim buddy. You can also embellish the fins with tiny seed beads, add glitter yarn accents for a mermaid-core vibe, or embroider tiny scale patterns using contrasting thread for extra texture. Don't have oval safety eyes on hand? Small round safety eyes or even hand-embroidered French knot eyes work beautifully too, giving each fish a slightly different, equally endearing expression.

I designed this fish keychain because I wanted a project that felt fast, cute, and genuinely useful — something you could finish and actually use the same day! Working in continuous spiral rounds with velvet yarn gives these little guys such a plush, professional finish, and there's something so satisfying about watching the rounded belly take shape with just simple increases. I love how the oval safety eyes instantly give each fish so much personality before you've even added the embroidered mouth and blushy pink cheeks. The small scale means you're never far from finishing, which makes this one of those projects where you cast on 'just to try it' and suddenly have three fish done in an afternoon. Attaching the keychain hardware at the end feels like the best kind of magic trick — turning a stuffed amigurumi into something you'll actually carry around every day. Whether you make the sunny yellow version or dream up your own color combo, this pattern scratches that itch for a project that's quick, colorful, and irresistibly huggable. It's proof that small amigurumi can pack a whole lot of charm into just a few inches.
Common mistakes

  • Losing track of the beginningAlways place a stitch marker in the first stitch of each round and move it up every time you complete a round — this is essential since there's no slip stitch join to mark your place.
  • Over-stuffing or under-stuffingAdd small pinches of fiberfill gradually as you work upward, checking that the body feels firm but still slightly squishable, especially before closing the final rounds.
  • Attaching the oval safety eyesDry-fit the eyes by inserting the posts without locking the backs first, then step back and check symmetry and spacing before securing them permanently on the inside.
  • Leaving too short a yarn tailLeave at least a 6-inch tail at any point where you'll be sewing or attaching hardware, since short tails are difficult to weave in securely and can work loose over time.
  • Skipping the invisible finishCinch the final round closed by weaving your tapestry needle through the front loops of the remaining stitches and pulling tight before securing with a few backstitches.

The pattern

Written out round by round

Materials

Yarn

  • Velvet/velour weight yarn (approx. CYCA #3 DK/Light Worsted) in the following colors:
  • Yellow
  • Lilac
  • Green
  • Violet
  • Pink (small amount for cheek embroidery)
  • Black cotton-blend yarn (small amount for mouth embroidery)

Hook

  • D-3 / 3.0 mm

Safety eyes

  • Oval, 9×12 mm — 1 pair per fish

Stuffing

  • Polyfill fiberfill (light amount)
  • Stitch marker
  • Tapestry needle
  • Scissors
  • Keychain hardware ring (1 per fish)
  • Decorative embellishments (optional)

Abbreviations

  • ch = Chain
  • dc = Double Crochet
  • dec = Decrease (invisible decrease)
  • hdc = Half Double Crochet
  • inc = Increase (2 sc in same stitch)
  • sc = Single Crochet
  • sl st = Slip Stitch
  • SM = Stitch Marker
  • st(s) = Stitch(es)

Yellow Fish

Begin with yellow yarn. Place SM on belly side.

  1. Round 1Ch 2, work 8 sc in 2nd ch from hook. (8)
  2. Round 2Inc in each st around. (16)
  3. Round 3*1 sc, 1 inc; repeat from * around. (24)
  4. Round 4-5Sc in each st around. (24)Change to lilac yarn. Do not cut yellow yarn. Continue alternating both colors as directed.
  5. Round 6(Lilac): Sc in each st around. (24)

Fins are worked in Rnd 7. The large fin uses short turning rows; ch 1 at the end of each turning row to turn.

  1. Round 7(Yellow): 2 sc along body; ch 4, sl st in 2nd ch from hook, sl st in next ch, hdc in last ch (small fin made) ; 9 sc along body; ch 5, sl st in 2nd ch from hook, sl st in next ch, hdc in next 2 ch, turn, 2 sc, 2 sl st, ch 1, work sl st edging along top and front edge of fin (large fin made) ; 10 sc along body; ch 4, sl st in 2nd ch from hook, sl st in next ch, hdc in last ch (small fin made) ; 3 sc along body. (24 body sts)(24)
  2. Round 8(Lilac): Sc in each st around. (24)
  3. Round 9(Yellow): Sc in each st around. (24)Insert safety eyes between Rnds 3 and 4 now if not already placed.
  4. Round 10*2 sc, dec; repeat from * around. (18)
  5. Round 11*1 sc, dec; repeat from * around. (12)
  6. Round 12*2 sc, dec; repeat from * around. (9)Change to lilac yarn. Fasten off and cut yellow yarn.Fold the piece in half with the belly marker aligned correctly. Working through both layers, work 4 sc across to close the opening. Do not cut yarn.Ch 3, turn.Into 1st ch: 2 dc, ch 3, sl st into same ch.Into last ch: 2 dc, ch 3, sl st into same ch.Fasten off and cut yarn.(2)

Closing & Tail — Yellow Fish:

Green Fish

Begin with green yarn. Place SM on belly side.

  1. Round 1Ch 2, work 8 sc in 2nd ch from hook. (8)
  2. Round 2Inc in each st around. (16)
  3. Round 3*1 sc, 1 inc; repeat from * around. (24)
  4. Round 4-5Sc in each st around. (24)Insert safety eyes between Rnds 3 and 4 now.Change to violet yarn. Do not cut green yarn. Continue alternating both colors as directed.
  5. Round 6(Violet): Sc in each st around. (24)
  6. Round 7(Green): Sc in each st around. (24)
  7. Round 8(Violet): Sc in each st around. (24)
  8. Round 9-10(Green): Sc in each st around. (24)Change to violet yarn. Fasten off and cut green yarn.Fold the piece in half with the belly marker aligned correctly. Working through both layers, work 12 sc across to close the opening. Do not cut yarn.Ch 1, turn.Ch 3, work 2 dc-inc (4 dc total across 2 sts).Ch 3, sl st into stitch containing the last increase.Fasten off and cut yarn.(5)

Closing & Tail — Green Fish:

Assembly

Step 1

Mouth: Using black cotton-blend yarn and a tapestry needle, embroider a small curved mouth on the face of each fish.

Step 2

Cheeks: Using pink plush yarn, embroider two small cheek circles on either side of the face (optional but charming).

Step 3

Embellishments: Attach any decorative elements you'd like — small bows, beads, or charms — using a tapestry needle and matching yarn (optional).

Step 4

Keychain hardware: Attach a keychain ring firmly to the top center of each fish using your tapestry needle and a short length of yarn, or thread the ring directly through the top stitches.

Step 5

Weave in all ends securely on both fish.

Important notes

💡 Velvet yarn splits easily, so work with shorter arm's-length lengths and use a tapestry needle with a slightly blunter tip when weaving in ends.

💡 Stuff the body in small increments as you close each round rather than waiting until the end — this prevents lumps and makes it easier to reach into the narrowing opening.

💡 Position your stitch marker on the outside of the work, not buried in the stitch, so it stays visible and easy to move each round.

💡 When embroidering the pink cheeks and black mouth, use a single strand and go over the area twice for richer, more visible color against the velvet texture.

💡 Attach the keychain hardware ring securely with several stitches through a sturdy point on the body, then test-tug it gently before considering the fish finished.

📏 This pattern is written in US crochet terminology.

📏 Gauge is not critical for this project; finished size will vary based on yarn weight, hook size, and tension. Sample size is approximately 3 inches (7–8 cm) in length.

💡 Each fish is worked as a single piece from head to tail — no separate assembly of body parts. Stuff lightly as you go, since the finished toy should remain relatively flat, not fully rounded.

💡 The stitch marker tracks the belly line throughout. At every color change, work slip stitch offset stitches as needed to keep the marker correctly positioned on the belly side — velvet yarn makes color jogs very visible, so this step is non-negotiable for clean stripes.

💡 For the fin round on the Yellow Fish (Rnd 7), use a separate stitch marker to mark your starting point before beginning, so you can verify your 24 body stitch count at the end without losing your place — the fin round breaks the regular rhythm of the spiral.

💡 Invisible decrease in velvet yarn: insert your hook under the front loops of the next two stitches simultaneously, yarn over, and pull through — velvet fiber grabs well and makes this technique very forgiving, so your decrease points will be virtually invisible in the finished piece.

💡 Keep your tension snug — velvet yarn has a tendency to hide loose stitches until the piece is stuffed, then every gap shows. Work slightly tighter than feels natural to keep the fabric dense and the stuffing invisible.

FAQs

Frequently asked questions

What yarn works best for this fish amigurumi keychain?

A velvet or velour weight yarn similar to CYCA #3 DK/Light Worsted gives the fish its signature soft, plush look. If you don't have velvet yarn, a smooth worsted-weight cotton or acrylic will still work well, just with a slightly less glossy finish.

Can I make this pattern without the keychain hardware?

Absolutely — simply skip attaching the hardware ring and you'll have a mini amigurumi ornament or a cute stuffed toy topper instead. You could also sew on a loop of yarn for hanging it as a decoration. If making them for young children, embroider the eyes rather than using safety eyes, as small hardware can pose a choking hazard.

Do I need to join each round with a slip stitch?

No, this pattern is worked entirely in continuous spiral rounds, so you never join with a slip stitch unless the pattern specifically says to. Just use a stitch marker to track where each round begins.

How much yarn do I need for one fish?

Since the finished fish is only about 3 inches long, you'll need just a small amount of each color — often leftover scraps from other projects are enough. It's a great way to use up velvet yarn odds and ends.

What size safety eyes should I use?

The pattern calls for oval safety eyes in 9×12mm, one pair per fish, which suit the small scale nicely. If you prefer a different expression, round safety eyes in a similar size or hand-embroidered eyes work as substitutes.

How do I keep the fish flat instead of puffy?

The key is to stuff very lightly — just a thin, even layer of fiberfill before you begin the decrease rounds. These fish are designed to be flat keychains, so resist the urge to over-stuff. Check the silhouette from the side as you go and stop adding filling the moment the body feels slightly padded but still lies flat.

The fin round on the Yellow Fish looks complicated. Any advice?

Take it slowly and place a stitch marker at the start of Rnd 7 before you begin. Each fin is a small chain extension worked off the body, so your body stitch count of 24 stays the same — the fins are additions, not replacements. Work each chain, complete the fin, then return to the body and count as you go to stay on track.

One at a time —

Get the next pattern

Tested round by round before it is sent. No spam.