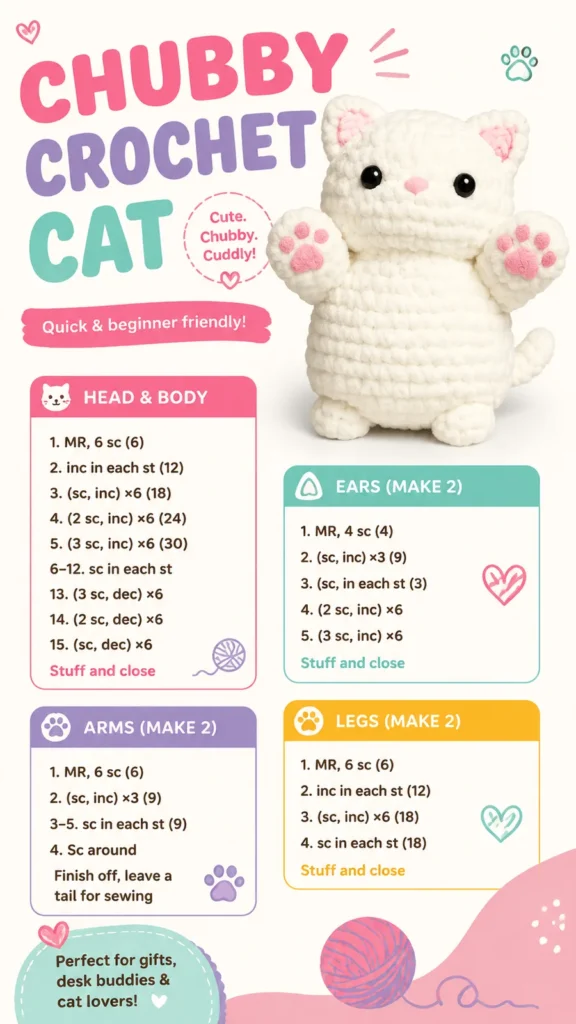
Made and counted by Wren —

Chubby Cat Amigurumi Crochet Pattern for Beginners

Make this easy chubby cat amigurumi with single crochet stitches, tiny ears, and a curved tail—a beginner-friendly plush perfect for gifting.

Chubby Cat Amigurumi Crochet Pattern for Beginners
Easy to IntermediateLevel
4-6 HoursTime
3.5 mmHook
WorstedYarn
Jump to the pattern

At a glance

Start the head and body as a single continuous piece worked in tight single crochet rounds from the bottom up.

Shape the wide oval body first, then transition smoothly into the slightly oversized head without breaking yarn.

Stuff the head and body firmly in small sections as you close up the rounds to keep the shape rounded.

Crochet two small folded ears separately, giving them a slight cone shape rather than working them flat.

Make two short legs as separate stuffed pieces designed to create a cute raised-paw effect.

Crochet a narrow curved tail and lightly stuff it, or leave it flexible for a softer bend.

Add the pink nose and paw details along with eyes, either embroidered or attached as safety eyes.

Sew the ears, arms, legs, and tail onto the body in their final positions to complete the chubby cat.

About this pattern

This chubby cat amigurumi pattern creates the kind of squishy, round plush that makes you want to squeeze it the moment it's finished. With its oversized head, compact oval body, and stubby little legs, this design captures that classic kawaii charm crocheters adore. It's a wonderful project for anyone who loves amigurumi animals but wants something quick and satisfying rather than a multi-week commitment, and it makes an especially sweet gift for cat lovers, new parents, or fellow crafters.

The entire head and body are worked as one continuous piece in tight single crochet rounds, which keeps the seamless silhouette smooth and prevents any stuffing from peeking through. You'll separately crochet two small folded ears, two arms, and two stubby legs, then sew everything together at the end. This is rated easy to intermediate, so if you've made even one amigurumi before, you'll feel right at home; total crafting time runs about 4 to 6 hours depending on your stitching speed.

The finished cat has that irresistible chubby, rounded shape—big head, small body, tiny raised paws, and a curved tail that adds just the right amount of personality. Worked in soft neutral shades like white, cream, or gray, it reads as a gentle, huggable nursery accent, while brighter yarn colors turn the same shape into a playful character toy. Either way, it's a plush that looks handmade in the best possible sense: cozy, charming, and built to be loved.

Variations

I adore this pattern because it proves you don't need dozens of pieces to make something absolutely charming. Working the head and body in one continuous single crochet piece means fewer ends to weave in and a smoother, more seamless shape right from the start. There's something so satisfying about watching that tight single crochet fabric build up round by round, knowing it's going to hold the stuffing perfectly without any gaps showing through. The two folded cone-like ears are a fun little technique on their own, and attaching them just right near the top of the head is where this cat really starts to feel alive. I also love how forgiving the stubby legs are—no fussy shaping, just short stuffed pieces that give that classic raised-paw amigurumi look. And the curved tail? It's the detail that turns a round blob into a cat. This is the kind of project where every small piece adds personality, and by the time you're sewing on the face details, you'll already be smitten with your little chubby companion.

Common mistakes

  • Working the single crochet stitchesSince this is worked in continuous rounds without a seam, loose stitches let stuffing peek through and make the shape look lumpy. Go down a hook size from what's recommended for your yarn weight to keep the fabric dense and smooth.
  • Losing track of where the round beginsBecause the head and body are worked in one continuous spiral rather than joined rounds, it's easy to drift off count. Place a stitch marker in the first stitch of every round and move it up as you go so your increases and decreases land in the right spot.
  • Underestimating how much stuffing the oversized head needsA too-lightly-stuffed head will look saggy and lose that chubby, rounded silhouette that makes this pattern so cute. Stuff firmly in small handfuls, working stuffing into the sides as you go rather than dropping it all in at once.
  • Attaching the ears flatThe ears are meant to keep a slight folded, three-dimensional shape rather than lying completely flat against the head. Pinch the base of each ear slightly as you sew it on so it keeps that perky, alert cat-ear angle.
  • Sewing the legs on without matchingIf the legs are stuffed much firmer or looser than the body, they can look mismatched or wobbly once the cat is set on a shelf. Stuff the legs to a similar firmness as the body and test-balance the cat before securing them permanently.
  • Placing the tail too high or too low on the backSince the tail is a narrow, flexible piece, its placement really affects the cat's overall look and balance. Pin it in place first and view the cat from multiple angles before stitching it down permanently.

The pattern

Written out round by round

Materials

  • Plush yarn or soft acrylic yarn in main color, approximately 120 yards (110 meters)
  • 3.5 mm (US E-4) crochet hook
  • Small amount of pink yarn for nose and paw details
  • Black embroidery thread or safety eyes
  • Polyester fiberfill stuffing
  • Yarn needle
  • Stitch marker
  • Scissors

Abbreviations

  • MR = Magic ring
  • sc = Single crochet
  • inc = Increase, two single crochet stitches in one stitch
  • dec = Decrease, single crochet two stitches together
  • st = Stitch
  • sl st = Slip stitch
  • FO = Fasten off
  • Terminology = US crochet terms

Head and Body

Work in continuous rounds. Do not join rounds. Place a stitch marker in the first stitch and move it upward as you crochet.

  1. Round 1Make MR, 6 sc into ring. (6)
  2. Round 2Inc in each stitch around. (12)
  3. Round 3(Sc in next stitch, inc) repeat 6 times. (18)
  4. Round 4(Sc in next 2 stitches, inc) repeat 6 times. (24)
  5. Round 5(Sc in next 3 stitches, inc) repeat 6 times. (30)
  6. Round 6-12Sc in each stitch around. (30)
  7. Round 13(Sc in next 3 stitches, dec) repeat 6 times. (24)
  8. Round 14(Sc in next 2 stitches, dec) repeat 6 times. (18)
  9. Round 15(Sc in next stitch, dec) repeat 6 times. (12)Begin stuffing firmly. Add more stuffing as the opening becomes smaller.
  10. Round 16Dec around. (6)

FO and close the opening using a yarn needle.

Ears Make 2

  1. Round 1MR, 4 sc into ring. (4)
  2. Round 2(Sc, inc) repeat 2 times. (6)
  3. Round 3(Sc, inc) repeat 3 times. (9)
  4. Round 4Sc around. (9)

FO leaving a long tail for sewing. Fold the ear slightly flat before attaching.

Arms Make 2

  1. Round 1MR, 6 sc. (6)
  2. Round 2(Sc, inc) repeat 3 times. (9)
  3. Round 3-5Sc around. (9)

Lightly stuff the bottom half only. Flatten the top opening and sew closed.

Legs Make 2

  1. Round 1MR, 6 sc. (6)
  2. Round 2Inc around. (12)
  3. Round 3Sc around. (12)

FO and leave a sewing tail.

Tail

  1. Round 1MR, 6 sc. (6)
  2. Round 2-12Sc around. (6)

FO leaving a tail for sewing. Curve the tail naturally when attaching.

Special Techniques

Invisible decrease: Insert hook into the front loop only of the next two stitches, yarn over, pull through both loops, yarn over again, and complete the single crochet. This creates a smoother decrease.

Assembly

Step 1

Sew ears onto the top corners of the head.

Step 2

Attach safety eyes between rounds 7 and 9, leaving even spacing.

Step 3

Embroider a small pink nose and optional whiskers.

Step 4

Sew arms onto the sides of the body.

Step 5

Attach legs underneath the body for a stable sitting position.

Step 6

Sew the tail onto the back lower section of the cat.

Step 7

After assembly, gently shape the cat by pressing the stuffing into an even rounded form. If using acrylic or plush yarn, avoid excessive heat. Hand washing with mild soap and air drying is recommended to help maintain the shape and softness.

Step 8

For a polished finish, weave all yarn ends securely inside the plush. Embroidered details should be tightened and checked regularly if the toy will be handled often.

Important notes

💡 Use a hook one size smaller than the yarn label suggests to keep your single crochet tight enough that stuffing won't show through the finished piece.

💡 Move your stitch marker up at the start of every round on the head and body—since it's worked continuously, this is the only way to reliably track your rounds.

💡 Stuff the head firmly and evenly in small pieces rather than one big clump, working it into the sides so the chubby, rounded shape holds its form.

💡 If using safety eyes instead of embroidery thread, insert and secure them before you finish stuffing and closing up the head—it's much harder to attach them afterward.

💡 Keep a short length of your main color yarn on hand for closing seams so your sewing thread matches perfectly and stays invisible along the finished edges.

💡 When making the ears, leave a slightly longer tail than usual so you have plenty of yarn to both shape the fold and stitch it securely to the head.

⚠️ Plastic safety eyes may not be suitable for babies or children under three. For baby-safe versions, replace plastic eyes with securely embroidered facial features.

📏 This cat measures approximately 6 inches tall (15 cm), with a gauge of about 18 single crochet stitches x 20 rounds in a 4 inch (10 cm) square using the recommended 3.5 mm (US E-4) hook—keeping close to gauge helps maintain the pattern's proportions.

FAQs

Frequently asked questions

What yarn weight works best for this chubby cat pattern?

A worsted weight plush or soft acrylic yarn is ideal, giving you around 120 yards for the whole project. Plush yarns create an extra-soft, huggable texture, while standard worsted acrylic gives crisper stitch definition if you prefer visible detail.

Can I use safety eyes instead of embroidering the face?

Yes, the materials list includes both options—safety eyes or black embroidery thread. Just remember to attach safety eyes to the head piece before you finish stuffing and closing it, since they're much easier to secure while you can still reach inside.

Why is the head and body worked as one piece instead of two?

Working the head and body continuously creates a seamless transition with no visible join line, giving the finished cat that smooth, rounded amigurumi look. It also means less finishing work since you're not sewing a head onto a separate body.

How much stuffing will I need for this project?

You'll need a moderate amount of polyester fiberfill—enough to firmly fill the head and body plus the smaller leg pieces. It's better to stuff in small increments and check the shape frequently rather than guessing all at once.

Is this pattern really suitable for beginners?

Yes, it's rated easy to intermediate beginner since it relies mainly on single crochet worked in continuous rounds, which is very approachable. The main skills to be comfortable with are basic shaping through increases/decreases and simple hand-sewing to assemble the pieces.

One at a time —

Get the next pattern

Tested round by round before it is sent. No spam.