Made and counted by Wren —

Bonnie the Bunny Baby: Free Amigurumi Crochet Pattern

Crochet Bonnie the Bunny Baby with this free amigurumi pattern featuring a soft bulky yarn body, floppy ears, and an optional bonnet and headband.

IntermediateLevel
4-6 HoursTime
5 mmHook
Super BulkyYarn
Jump to the pattern

At a glance

Crochet the head on the 7mm hook, working magic ring increases and decreases to shape the rounded face.

Work the arms and legs as separate small tubes, stuffing lightly as each piece is completed.

Crochet the body on the 8mm hook, building it up with shaping rounds into a soft, rounded form.

Add a fluffy tail using fur yarn on the 8mm hook, finishing it off with the optional pom pom if desired.

Stuff the head and body firmly, then assemble all the pieces together following the seven assembly steps.

Attach the safety eyes to the head before final assembly, checking placement carefully for a balanced expression.

extra flair, crochet the optional bonnet and headband in worsted weight yarn on the 5mm hook and attach them last.

About this pattern

Bonnie the Bunny Baby is a plush, chunky amigurumi bunny worked up in super bulky yarn, giving her a soft, oversized huggability that regular worsted weight bunnies just can't match. With her floppy ears, rounded body, and sweet little arms and legs, she's the kind of toy that looks like it belongs on a nursery shelf right out of a storybook. This pattern is perfect for crocheters who want a fast-growing project with big, satisfying stitches and a finished piece that feels substantial in your hands from the very first round.

You'll work the head on a 7mm hook while the ears, arms, legs, and body all come together on an 8mm hook, giving Bonnie her signature plush, slightly loose stitch definition that's ideal for amigurumi. Expect to use magic rings, single crochet increases and decreases, and continuous rounds throughout, plus a fun furry-yarn tail for texture contrast. This is a comfortable intermediate project — if you've made one or two amigurumi before, you'll breeze through it in a focused weekend, roughly 4 to 6 hours of stitching and stuffing.

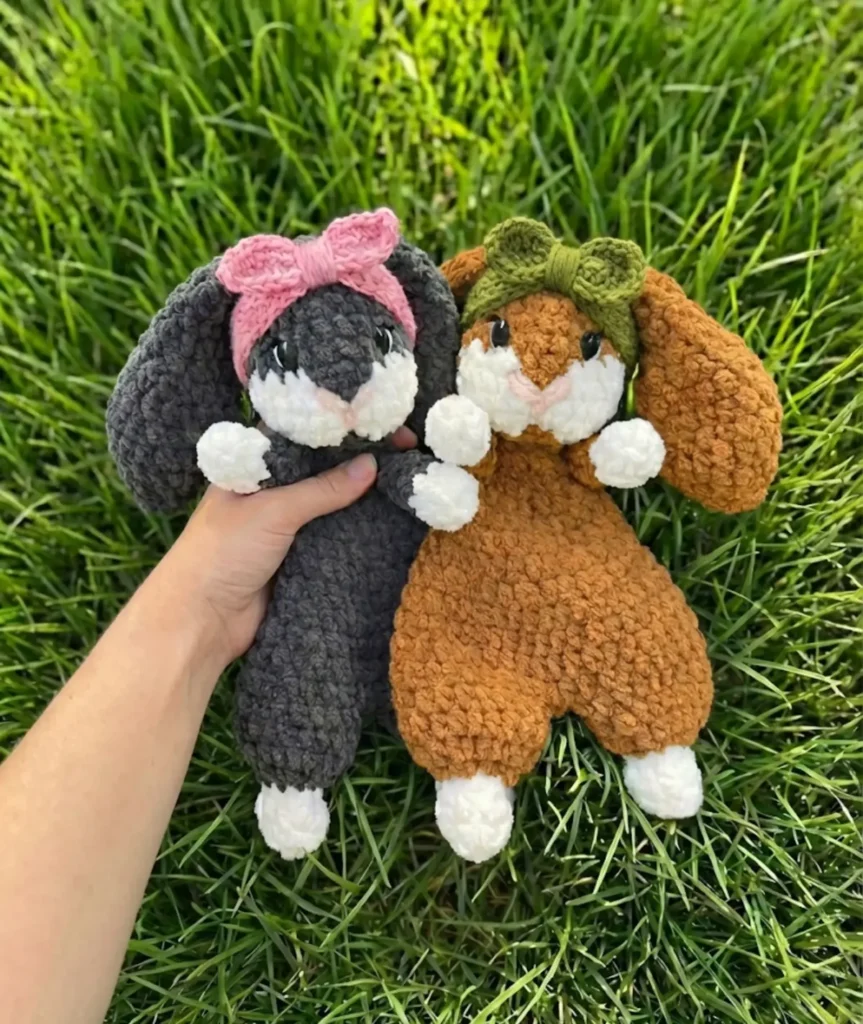
The finished Bonnie is a sizable, squishy bunny with a rounded belly, safety-eyed face, and optional worsted-weight bonnet and headband for extra personality. She has that irresistible chunky-yarn look that feels modern and giftable, not old-fashioned or scratchy. Whether you keep her for your own little one or wrap her up for a baby shower, she's a heartfelt handmade present that will be treasured long after the wrapping paper is gone.

Variations

Bonnie is incredibly easy to customize once you've got the basic construction down. For a color-blocked look, use your contrast-color super bulky yarn on the ears and paws instead of just accessories — try a soft blush contrast against a cream or oatmeal main color for a classic baby-shower palette, or a dusty sage with white for a gender-neutral gift. If you want a smaller keepsake version, drop down to worsted weight (Weight 4) yarn with a 5mm or 5.5mm hook throughout instead of super bulky — just know your stitch counts will look tighter and denser, and she'll finish noticeably smaller and firmer, so plan for a bit more stuffing patience. Brands like Bernat Blanket or Wool-Ease Thick & Quick work beautifully for the bulky main color, while With Love is a nice budget-friendly worsted option for the bonnet and headband. For a seasonal twist, swap the bonnet for a simple crocheted flower appliqué on the headband, or work the bonnet in a soft pastel yellow with a tiny contrast-color brim for an early-spring nursery vibe. If you want Bonnie to double as a lovey or comfort toy, consider making the ears slightly longer by adding a couple of extra rounds before the decrease sequence, so they flop down nicely for little hands to hold. You could also skip the safety eyes entirely and embroider a simple stitched face instead, which makes her fully safe for babies under three and adds a softer, more heirloom-style look. Finally, try working the tail in a solid color yarn instead of fur yarn and topping it with the optional pom pom for a playful pop of texture.
Common mistakes

  • Using the same hook size for the head and bodyRemember the head is worked on a 7mm hook while the ears, arms, legs, and body use an 8mm hook — mixing these up will throw off the proportions between Bonnie's face and the rest of her body, so double-check your hook before starting each part.
  • Losing track of stitch countsPlace a stitch marker at the start of every round and check your stitch count against the parenthetical number at the end of each round before moving on, especially through the shaping rounds on the head and body.
  • Chaining at the start of rounds that don't call for itThis pattern is worked in continuous rounds without a starting chain unless a row is specifically noted, so skip the chain-1 habit and simply move your stitch marker up each round instead.
  • Under-stuffing the head and body before closingBecause this pattern uses super bulky yarn, gaps show more easily than in fine yarn amigurumi, so stuff firmly and evenly as you go, adding small pinches of fiberfill throughout each section rather than stuffing all at once at the end.
  • Sewing safety eyes on without testing placement firstBefore snapping the eye backs on, insert the safety eye posts and hold the head up to check spacing and symmetry from multiple angles, since safety eyes are permanent once secured and placement makes a huge difference to Bonnie's expression.
  • Rushing the fur-yarn tail without securing it wellFur yarn can be slippery and hard to weave in neatly, so leave a longer tail end, weave it through several stitches in different directions, and consider a small dab of fabric glue at the base if you're worried about it working loose over time.

The pattern

Written out round by round

Materials

  • Super Bulky Yarn (Weight 6) — main color, approx. 70 yards
  • Super Bulky Yarn (Weight 6) — contrast color, approx. 20 yards (for accessories/optional color-blocking)
  • Fur yarn — small amount, for the tail
  • Worsted Weight Yarn (Weight 4) — for the bonnet and headband accessories

Hook

  • 5mm (US H-8)

Hook

  • 7mm (no standard US letter size)

Hook

  • 8mm (US L-11)

Tools

  • Polyester fiberfill (Polyfil)
  • 16mm safety eyes (not recommended for children under 3 years old)
  • Darning needle
  • Scissors
  • Stitch markers
  • Pom pom (optional, for the tail)

Abbreviations

  • ch = Chain
  • dc = Double Crochet
  • hdc = Half Double Crochet
  • hdc2tog = Half Double Crochet Two Stitches Together (invisible decrease)
  • inc = Increase
  • mc = Magic Circle
  • sc = Single Crochet
  • sc2tog = Single Crochet Two Stitches Together (invisible decrease)
  • sl st = Slip Stitch
  • st(s) = Stitch(es)
  • V st = V Stitch: (dc 1, ch 1, dc 1) all into one stitch
  • yo = Yarn Over

Head (7mm hook)

  1. Round 1sc 6 in mc. (6)
  2. Round 2sc inc in each st around. (12)Step by step: sc in each st around. (12); sc2tog in each st around. (6); Fasten off and leave a long tail for sewing. Stuff lightly to shape.
  3. Round 3sc 1, sc inc repeat around. (18)
  4. Round 4sc 5, sc inc repeat around. (21)
  5. Round 5-7sc in each st around. (21)
  6. Round 8sc 7, sc inc x3, sc2tog x2, sc inc x3, sc 4. (25)
  7. Round 9sc 10, sc inc, sc 2, sl st x2, sc 2, sc inc, sc 7. (27)
  8. Round 10sc 15, sl st x2, sc 10. (27)Place safety eyes between rounds 6–7, approx. 5 sts apart, aligned with the middle increase on round 8.
  9. Round 11sc 9, sc2tog x7, sc 4. (20)Begin stuffing — be careful not to overstuff. The bottom of the head should stay flat.
  10. Round 12sc2tog repeat around. (10)
  11. Round 13sc2tog repeat around. (5)Fasten off and weave through the outer loops to close gently.After rounds 12 and 13, the bottom of the head should be flat and not fully stuffed. Take extra stuffing and fill each cheek separately — avoid stuffing the space between the cheeks so they stay prominent when shaped.

Ears (make two, 8mm hook)

  1. Round 1sc 4 in mc. (4)
  2. Round 2hdc inc in each st around. (8)
  3. Round 3hdc 1, hdc inc repeat around. (12)
  4. Round 4hdc 2, hdc inc repeat around. (16)
  5. Round 5hdc in each st around. (16)
  6. Round 6hdc 2, hdc2tog repeat around. (12)
  7. Round 7hdc in each st around. (12)
  8. Round 8hdc 2, hdc2tog repeat around. (9)
  9. Round 9hdc in each st around. (9)
  10. Round 10hdc 1, hdc2tog repeat around. (6)
  11. Round 11hdc 1, hdc2tog repeat around. (4)Fasten off and leave a long tail for sewing.

Arms (make two, 8mm hook)

  1. Round 1sc 6 in mc. (6)
  2. Round 2hdc 1, hdc inc repeat around. (9)
  3. Round 3hdc 1, hdc2tog repeat around. (6)
  4. Round 4hdc in each st around. (6)
  5. Round 5hdc 2, hdc2tog, hdc 2. (5)
  6. Round 6hdc2tog, hdc 3. (4)Fasten off and set aside to crochet onto the body later.

Legs (make two, 8mm hook)

  1. Round 1sc 7 in mc. (7)
  2. Round 2hdc inc in each st around. (14)
  3. Round 3hdc 4, hdc2tog x3, hdc 4. (11)
  4. Round 4hdc2tog x3, hdc 1, hdc2tog x2. (6)
  5. Round 5hdc inc in each st around. (12)
  6. Round 6(1st leg): hdc 3 (round will be incomplete) . Fasten off and leave a long tail to sew gaps later.
  7. Round 6(2nd leg): hdc 9 (round will be incomplete) . Do not fasten off — continue directly to joining.Joining the legs: With both legs facing you, join them along the side with a hdc into the next stitch of the current leg and the first leg together — this join becomes the first stitch of round 1 of the body. Your hook goes behind the next stitch of the current (2nd) leg, then through the next stitch of the first leg to complete the hdc and join.

Body (8mm hook)

The joining of the legs counts as the first stitch of round 1.

  1. Round 1continue from joining legs together, hdc 11, in the space where the legs are joined — (hdc inc, hdc 1, hdc inc), hdc 11. (28)
  2. Round 2hdc in each st around. (28)
  3. Round 3hdc 5, hdc2tog repeat around. (24)
  4. Round 4hdc in each st around. (24)
  5. Round 5hdc 2, hdc2tog repeat around. (18)
  6. Round 6hdc in each st around. (18)
  7. Round 7hdc 1, hdc2tog x5, hdc 1, attach 1st arm in the next hdc2tog. Insert your hook through the first stitch of the arm and hdc2tog in the body layer; continue attaching the 1st arm in the next round. (12)
  8. Round 8continue attaching the 1st arm in the next st, hdc 4, attach the 2nd arm in the next 2 sts, hdc 5. (12)
  9. Round 9hdc2tog in each st around. (6)Fasten off and leave a long tail to sew onto the head.

Tail (use fur yarn + 8mm hook)

  1. Round 1sc 6 in mc. (6)
  2. Round 2sc inc in each st around. (12)
  3. Round 3sc in each st around. (12)
  4. Round 4sc2tog in each st around. (6)Fasten off and leave a long tail for sewing. Stuff lightly to shape.

Bonnet — optional accessory (5mm hook)

In rows 2–7, ch 4 counts as a dc + ch 1.

  1. Round 1ch 29, sc in the 2nd back bump of the ch from hook, sc in each back bump of the ch — turn. (28)
  2. Round 2ch 4, dc 1 in the same st, sk 2 sts, V st in the next st, sk 2 sts, V st repeat x8 — turn. (10 V sts)(10)
  3. Round 3ch 4, dc 1 in the next ch-1 space, (V st in next ch-1 space) x2, ch 3, sk next V st, (V st in next ch-1 space) x2, ch 3, sk next V st, (V st in next ch-1 space) x2, dc 1 in next ch-1 space, ch 1, dc 1 into the 3rd ch — turn. (8 V sts)(8)
  4. Round 4ch 4, dc 1 in the next ch-1 space, (V st in next ch-1 space) x2, V st into the ch-3 space, (V st in next ch-1 space) x2, V st into the ch-3 space, (V st in next ch-1 space) x2, dc 1 in the next ch-1 space, ch 1, dc 1 into the 3rd ch — turn. (10 V sts)(10)
  5. Round 5-7ch 4, dc 1 in the next ch-1 space, (V st in next ch-1 space) x8, dc 1 in the next ch-1 space, ch 1, dc 1 into the 3rd ch — turn. (10 V sts)Finishing: ch 1, fold the bonnet in half and loosely sl st closed.Fasten off and weave in ends.(10)

Ties: ch 18 for the first tie. Holding the bonnet upside down, sc 1 in the first ch, sc 1 in the next sc, sc 2 in each dc/ch across, sc 1 in the next sc, sc 1 in the last ch, then ch 18. Fasten off. For a snugger fit around the head and neck, sc 1 in each dc/ch across instead of sc 2.

Headband — optional accessory (5mm hook)

Finished headband measures approx. 15 inches.

  1. Round 1ch 2, sc in the 2nd back bump of ch from hook — turn. (1)
  2. Round 2ch 1, hdc 3 inc — turn. (3)
  3. Round 3ch 1, hdc inc, hdc, hdc inc — turn. (5)
  4. Round 4ch 1, hdc inc, hdc 3, hdc inc — turn. (7)
  5. Round 5ch 1, hdc2tog, hdc 3, hdc2tog — turn. (5)
  6. Round 6ch 1, hdc2tog, hdc, hdc2tog — turn. (3)
  7. Round 735 ch 1, hdc in each st across — turn. (3) Measure the headband around the head after this row to confirm length before continuing — rows may need to be added or removed.
  8. Round 36ch 1, hdc inc, hdc, hdc inc — turn. (5)
  9. Round 37ch 1, hdc inc, hdc 3, hdc inc — turn. (7)
  10. Round 38ch 1, hdc2tog, hdc 3, hdc2tog — turn. (5)
  11. Round 39ch 1, hdc2tog, hdc 1, hdc2tog — turn. (3)
  12. Round 40ch 1, sc3tog — turn. (1)Fasten off and weave in ends.

Assembly

Step 1

Sew the ears onto round 3 of the head, spacing them approximately 7–8 stitches apart.

Step 2

Shape the face: thread a darning needle with about 10 inches of worsted yarn, insert it through the back of the head and out the right side of the right eye. Bring it up and across to the left side of the left eye, then back down and out the same starting point at the back of the head. Pull both ends gently to define the shape, then tie off securely.

Step 3

Shape the cheeks: with a fresh 10-inch length of yarn, insert your needle through the back of the head and come out at round 13. Insert it into round 8 and back out to the same starting point at the back of the head. Pull tight to define the cheeks and tie off.

Step 4

Embroider the nose: starting with your nose-color yarn, come out at round 8, cross to the opposite side of the cheek (approx. 3–4 sts) and back to create a line across, then repeat one stitch below the first pass. Take the needle under and over both passes, back down to round 12, and exit at the starting point. Pull tight and tie off.

Step 5

Sew the completed body onto round 13 of the head.

Step 6

Sew the tail onto rounds 2–3 of the body.

Step 7

Add the bonnet or headband accessory, if using, and weave in any remaining ends.

Important notes

💡 Keep your 7mm and 8mm hooks clearly labeled or separated as you work — it's easy to grab the wrong one mid-project since the size difference is subtle by feel but makes a real difference in Bonnie's proportions.

💡 Since this pattern is worked in continuous rounds, use a stitch marker in the first stitch of every round and move it up as you go so you never lose your place, especially during the longer 11-round head and ear sections.

💡 Stuff Bonnie's head and body in small amounts as you crochet the final few rounds rather than cramming it all in at the last second — this gives you a smoother, rounder finished shape with super bulky yarn.

💡 If you're making Bonnie for a child under three, skip the 16mm safety eyes and embroider the eyes instead, since safety eyes are not recommended for that age group.

💡 Gauge is not critical for this project — focus on consistent tension rather than matching a specific gauge.

💡 The pattern is written for a solid-color bunny. Contrast-color placement (for a spotted or cheeky-eared version) can be added freely to the head, ears, arms, and legs if you'd like a two-tone bunny.

💡 This pattern uses the Yarn Under/Yarn Over technique for tighter stitches that reduce gaps — insert your hook, put the yarn under the hook to pull up a loop, then yarn over and pull through both loops.

FAQs

Frequently asked questions

What size hook do I need for Bonnie the Bunny Baby?

You'll need three hook sizes: a 7mm hook for the head, an 8mm (US L-11) hook for the ears, arms, legs, body, and tail, and a 5mm (US H-8) hook for the optional bonnet and headband accessories.

Can I make Bonnie without the fur yarn tail?

Yes, you can substitute a small amount of your main color or contrast color yarn for the tail instead, or top a simple crocheted tail with the optional pom pom for a similar fluffy effect.

Is this pattern beginner-friendly?

Bonnie is best suited to confident beginners or intermediate crocheters, since it involves magic rings, increases, decreases, and working with multiple hook sizes across several separate pieces that need assembling.

How much yarn do I actually need?

Plan for about 70 yards of super bulky main color yarn and 20 yards of contrast color, plus a small amount of fur yarn for the tail and worsted weight yarn if you're adding the bonnet and headband.

Are safety eyes required, or can I use something else?

Safety eyes give Bonnie a polished amigurumi look, but they aren't required — you can embroider her eyes instead with a darning needle, which is also the safer choice for children under three years old.

One at a time —

Get the next pattern

Tested round by round before it is sent. No spam.