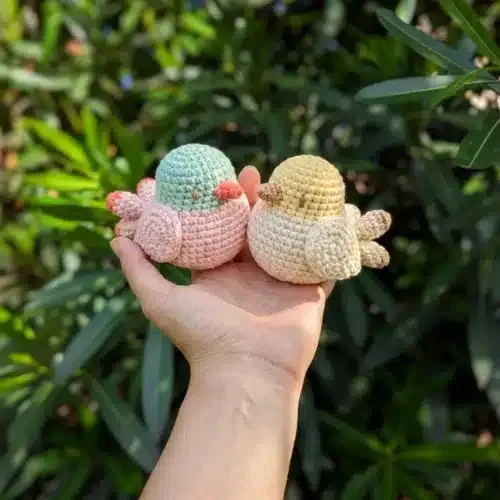
Made and counted by Wren —

Beginner amigurumi bird crochet pattern with wings and tail

3.5mm and 4mm hooks, medium weight yarn: crochet a beginner amigurumi bird with wings, tail, and beak.

Beginner amigurumi bird crochet pattern with wings and tail
BeginnerLevel
4-6 hoursTime
3.5 mmHook
WorstedYarn
Jump to the pattern

About this pattern

This pattern makes a stuffed amigurumi bird from four crocheted pieces: a 26-round body, two 9-round wings, a 3-round beak, and a 10-round tail, all started from a magic ring and worked in continuous rounds. Assembly attaches the tail at body row 11, positions wings at the body's midpoint, and finishes with a beak and safety eyes. Two hook sizes, 3.5 mm and 4 mm, are required.

This amigurumi bird is built from four separate pieces worked in continuous spiral rounds from a magic ring: a 26-round body, two wings worked identically to 9 rounds each, a 3-round beak closed with a slip stitch, and a 10-round tail. The body is the piece to watch — it grows in single-crochet increases round after round until closing at round 26, with the tail seam marked at row 11 partway through. Wings and beak are worked separately and sewn on after stuffing, so matching each piece's final round count keeps the finished bird symmetrical.

The pattern

Written out round by round

Materials

  • Medium weight yarn in your choice of colors (main color plus contrasting color for details)
  • 3.5 mm crochet hook
  • 4 mm crochet hook
  • Polyester fiberfill for stuffing
  • Safety eyes or black yarn for embroidering eyes
  • Yarn needle for weaving in ends
  • Scissors
  • Stitch marker (optional but helpful)

Abbreviations

  • MR = Magic Ring
  • sc = single crochet
  • inc = increase
  • dec = decrease
  • slst = slip stitch
  • ch = chain stitch
  • st = stitch

Body

Round 16 sc in a MR
Round 26 inc (12)
Round 3(1 sc, 1 inc) *6 (18)
Round 4(2 sc, 1 inc) *6 (24)
Round 5(3 sc, 1 inc) *6 (30)
Round 6(2 sc, 1 inc, 2 sc) *6 (36)
Round 736 sc
Round 8(5 sc, 1 inc) *6 (42)
Round 942 sc (42)
Round 1042 sc (42)
Round 115 sc, 5 sc with tail, 32 sc (42)
Round 1242 sc
Round 1342 sc
Round 1442 sc
Round 15(1 sc, 1 dec) *5, 27 sc (37)
Round 16Change color, (1 sc, 1 dec) *4, 23 sc, 1 dec (32)
Round 17(6 sc, 1 dec) *4 (28)
Round 18(5 sc, 1 dec) *4 (24)
Round 19(3 sc, 1 inc) *6 (30)
Round 2030 sc
Round 2130 sc
Round 2230 sc
Round 23(3 sc, 1 dec) *6 (24)
Round 24(2 sc, 1 dec) *6 (18)
Round 25(1 sc, 1 dec) *6 (12)
Round 266 dec Close with a slst and hide the yarn.

Wings (Make 2)

Round 16 sc in a MR
Round 26 inc (12)
Round 3(2 sc, 1 inc) *4 (16)
Rounds 4–616 sc
Round 72 sc, 2 dec, 4 sc, 2 dec, 2 sc (12)
Round 82 sc, 1 dec, 4 sc, 1 dec, 2 sc (10)
Round 910 sc Stuff lightly.
Round 101 sc, 1 dec, 3 sc, 1 dec, 2 sc
Round 114 dec Close with a slst and hide the yarn.

Beak

Round 13 sc in a MR
Round 23 inc (6)
Round 36 sc, slst

Tail

Round 16 ch + 1 ch
Round 25 sc, 3 sc in one st, 4 sc, 1 inc
Round 36 sc, 1 inc, 6 sc, 1 inc
Round 47 sc, 1 inc, 7 sc, 1 inc
Round 518 sc
Round 618 sc
Round 71 dec, 7 sc, 1 dec, 7 sc
Round 816 sc
Round 96 sc, 1 dec, 6 sc, 1 dec
Round 105 sc, 1 dec, 5 sc, 1 dec
Round 114 sc, 1 dec, 4 sc, 1 dec Join two sides together with 5 sc. Close with a slst and hide the yarn.

Assembly

Step 1Once you’ve completed all the individual pieces, it’s time to bring your bird to life! Start by firmly stuffing the body, being careful not to overstuff as this can distort the shape. Attach the tail securely at Row 11 of the body as indicated in the pattern. Position the wings on either side of the body, approximately at the midpoint, and sew them on securely. Finally, attach the beak to the front of the head and add your safety eyes or embroider eyes using black yarn.

Tester's notes

Row 11 of the body is the tail attachment point — place a stitch marker there while working round by round, since counting back after finishing all 26 rounds is slower and less accurate.

26 rounds shape the body from a 6-stitch magic ring to its final width — keep tension even throughout, since a loose round partway through will show as a visible bulge once stuffed.

Only the body calls for a color change, at round 16 — the wings, beak, and tail are each worked in one color from first round to last, so joins happen only when starting a new piece.

Stuff firmly but stop before the fabric strains, per the assembly step — overstuffing distorts the round shape the body reaches by round 26.

At a glance

Rounds49
Parts4
LevelBeginner
Time4-6 hours
Hook3.5 mm
YarnWorsted

Gauge check

After round 3 of the body, count stitches — the total should read 18; after round 3 of a wing it should read 16.

If either count comes up short or long, judge the fabric by feel: stitches should sit close enough that stuffing won't peek through but loose enough to work the hook easily, so adjust tension or hook size rather than chase an exact measurement.

Stitch-count checkpoints

  • Body · Round 6: 36 sts
  • Body · Round 15: 37 sts
  • Body · Round 23: 24 sts
  • Body · Round 25: 12 sts
  • Wings (Make 2) · Round 2: 12 sts
  • Wings (Make 2) · Round 3: 16 sts

If something looks wrong

The body cups instead of lying flat
Increases bunch too close together round after round; space each inc evenly across the round as the counts in rounds 2-5 direct (12, 18, 24, 30) rather than clustering them at the start.
The two wings end up different sizes.
One wing was left short of the full 9 rounds; recount rounds against the other wing before sewing either one on, since both need to reach round 9 before assembly.
The tail sits crooked or falls to one side.
It was attached off from row 11 or before the body was stuffed; reattach at row 11 exactly, after the body has stuffing in place, so the tail has a firm base.
The beak looks twisted instead of centered.
The round 3 slip stitch closure was pulled tight on one side; close round 3 evenly around all 6 stitches before weaving in, and center the beak on the head by eye before sewing.

Yarn substitutions

Cotton, worsted weightStitches hold their shape with less rounding at each increase, so the 26-round body may finish slightly smaller; a hook a half-size up from 4 mm keeps the fabric from stiffening too much, and stuffing shows less through the firmer stitches.
Acrylic, worsted weightMatches the stated 3.5 mm and 4 mm hooks without adjustment; drape stays soft and stuffing distributes evenly across all four pieces without extra bulk.
Wool-blend, DK weightSmaller stitches mean the same 26 rounds produce a noticeably smaller body; drop toward the 3.5 mm hook for every piece, and use less stuffing since the finished bird is scaled down overall.
FAQs

Questions

What size will the finished bird be?

The finished size depends on your yarn weight and hook size, but using medium weight yarn with a 3.5-4mm hook will create a bird approximately 6-7 inches tall, perfect for little hands to hold and cuddle.

When should I attach the tail to the body?

The tail is attached during Row 11 of the body construction. Work 5 sc, then crochet 5 sc attaching the tail, then continue with 32 sc to complete the round. This ensures the tail is securely integrated into the body structure.

How firmly should I stuff the wings?

The pattern specifies to stuff the wings lightly. They should have some body but remain flexible and not be overly firm. This helps them maintain their shape while still looking natural against the body.

Can I use different colors for this pattern?

Absolutely! Row 16 indicates a color change, which is perfect for creating a two-toned belly effect. You can choose any color combination you like to suit your style.

One at a time —

Get the next pattern

Tested round by round before it is sent. No spam.