Made and counted by Wren —

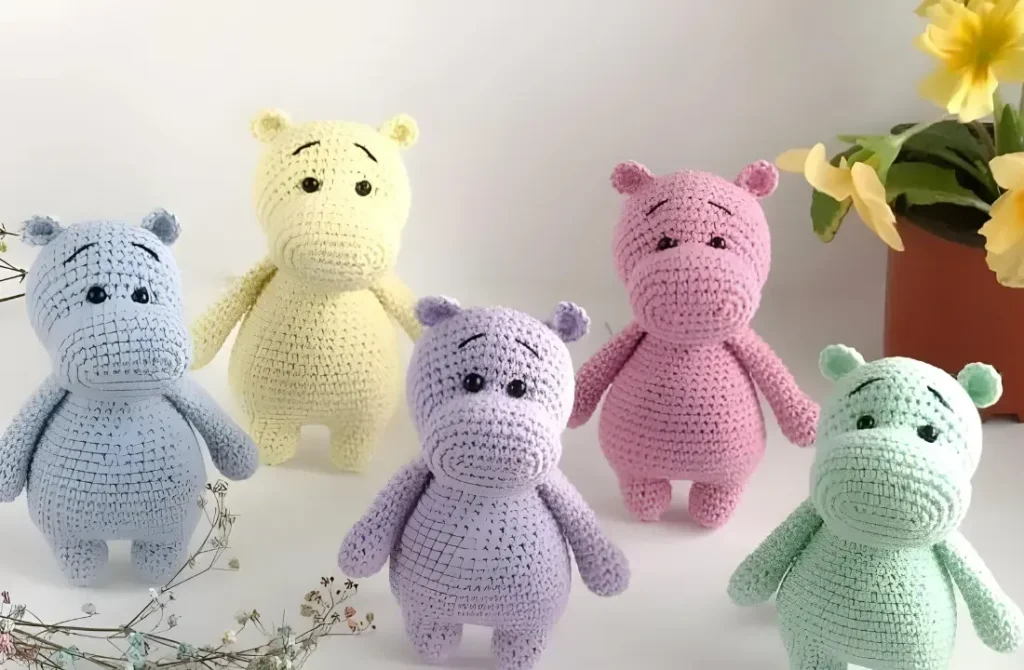
Amigurumi Hippo Crochet Pattern – Cute Stuffed Animal

Make an adorable amigurumi hippo with this free crochet pattern featuring safety eyes and embroidered brows. Perfect handmade gift for animal lovers!

Amigurumi Hippo Crochet Pattern - Cute Stuffed Animal
IntermediateLevel
4-6 HoursTime
5 mmHook
WorstedYarn
Jump to the pattern

At a glance

Start the head with a magic ring and build it up gradually through a series of increase rounds.

Shape the widening snout area across the middle rounds, watching your stitch count closely as it grows.

Insert the 5mm safety eyes once the head shape is established, checking placement before locking them in.

Stuff the head firmly with fiberfill as you continue working, packing fiberfill into the curves as you go.

Work the decrease rounds near the top of the head to begin closing the shape smoothly.

Complete any remaining small pieces following the same round-by-round shaping approach.

Embroider the black eyebrows above the eyes using a sewing needle for a sweet, expressive face.

Weave in all yarn tails securely to finish your huggable little hippo.

About this pattern

This amigurumi hippo pattern turns a few balls of yarn into the chubbiest, most huggable little river horse you've ever seen. With its round head, stubby limbs, and that unmistakable wide hippo grin, this project captures all the charm of the real animal in a soft, stitched-up form. It's a wonderful pick for anyone who loves animal amigurumi and wants to add a truly distinctive character to their collection — one that stands out from the usual bears and bunnies.

You'll work this hippo almost entirely in continuous rounds, building the head and body through a satisfying rhythm of increases and decreases that shape the classic hippo silhouette. Expect to use safety eyes for that professional finished look, along with black yarn or embroidery floss to stitch on those sweet little eyebrows that give the face its personality. This is a great pattern for confident beginners ready to level up, or intermediate crocheters looking for a relaxing weekend make.

Once stuffed and finished, your hippo comes together at roughly 13-14 cm (about 5.1-5.5 inches) tall — a perfectly palm-sized companion that's sturdy enough for play and soft enough for cuddling. The rounded shape and fiberfill stuffing give it a plump, tactile feel that's incredibly satisfying to squeeze. Whether it ends up on a shelf, in a nursery, or wrapped up as a gift, this little hippo is guaranteed to bring a smile to whoever receives it.

Variations

There's something so joyful about watching a plain ball of yarn transform into this round-bellied little hippo! I love how the head shaping — working through rounds like R7, R8, and R10 with their careful increases and decreases — builds that perfectly bulbous hippo snout without you even realizing how much shaping is happening. Setting the 5mm safety eyes always feels like the moment the project truly comes alive; suddenly you're not just holding stitches, you're holding a face. Embroidering the eyebrows afterward is my favorite finishing touch because it's where you get to add real personality — a slightly worried brow, a sleepy brow, whatever mood you're feeling that day. I also appreciate that this pattern doesn't demand a huge yarn stash or complicated color changes to look impressive; it's all about clean, confident shaping. By the time you reach the later rounds like R24, R25, and R26, you can already see the finished silhouette taking form, and that payoff after all your stitching is incredibly rewarding. It's a pattern that feels productive from start to finish.

Common mistakes

  • Losing track of stitch count during the increase-heavy early rounds like R2 and R4, which throws off the head's roundness.Place a stitch marker at the start of each round and recount your stitches before moving to the next round — catching an error early saves you from unraveling much later.
  • Attaching the safety eyes too early, before confirming spacing and symmetry on the actual head shape.Insert the eyes without locking the washers first, hold the head up, and check the placement from multiple angles before snapping them permanently into place.
  • Under-stuffing the head and body, leaving the finished hippo looking lumpy or floppy instead of nice and round.Stuff firmly and in small handfuls as you go, pushing fiberfill into every curve, especially around the R7-R10 shaping rounds where the snout widens.
  • Sewing on the eyebrows with stitches that are too large or uneven, making the face look off-balance.Use a sharp sewing needle and small, consistent straight stitches, working slowly and checking symmetry against a mirror or photo as you embroider.
  • Leaving too short a yarn tail when closing up the final rounds, making it hard to sew pieces together securely.Leave at least a 6-8 inch tail at every closing point so you have plenty of length for weaving in ends and attaching parts.

The pattern

Written out round by round

Materials

  • Black yarn or embroidery floss for eyebrows
  • 5 mm safety eyes
  • Sewing needle
  • Scissors
  • Fiberfill
  • 13-14 cm (5.1-5.5″)

Abbreviations

  • ch = chain
  • st = stitch
  • sc = single crochet
  • inc = increase
  • dec = decrease
  • R = round

Head

Make 9 ch. Make an oval, starting from the 2nd ch from hook, work on both sides of the chain.

  1. Round 1from the 2nd ch from hook: 7 sc, 3 sc in last st, turn: 8 sc [18]Step by step: 12 sc (4 rows) Fasten off. Ready to Learn More? Open the next page for Further Guidance!; Pages: 1 2.(18)

R 2

  1. Round 1inc, 6 sc, 3 inc, 6 sc, 2 inc [24](24)
  2. Round 31 sc, inc, 6 sc, (1 sc, inc) repeat 3 times, 6 sc, (1 sc, inc) repeat 2 times [30](30)

R 4

  1. Round 1(4 sc, inc) repeat 6 times [36](36)

R 7

  1. Round 1(4 sc, dec) repeat 6 times [30](30)

R 8

  1. Round 1(3 sc, dec) repeat 6 times [24](24)

R 10

  1. Round 1(3 sc, inc) repeat 6 times [30](30)
  2. Round 11(4 sc, inc) repeat 6 times [36] Insert safety eyes between R 10 and R 11 at the distance of 4 sc from each other.

R 12

  1. Round 1(5 sc, inc) repeat 6 times [42](42)

R 13

  1. Round 1(6 sc, inc) repeat 6 times [48](48)

R 20

  1. Round 1(6 sc, dec) repeat 6 times [42](42)

R 21

  1. Round 1(5 sc, dec) repeat 6 times [36](36)

R 24

  1. Round 1(2 sc, dec) repeat 6 times [18](18)

R 25

  1. Round 1(1 sc, dec) repeat 6 times [12](12)

R 26

  1. Round 1(dec) repeat 6 times [6] Fasten off.

R 2

  1. Round 1(inc) repeat 6 times [12](12)

R 6

  1. Round 1(2 sc, dec) repeat 2 times [9](9)
  2. Round 7-169 sc (10 rows) Stuff 1/2 full. Fold the top opening flat and 4 sc through both sides.Fasten off.

Legs and body

Important notes

💡 Use a hook size that keeps your stitches tight and close together — amigurumi should never have visible gaps where stuffing can peek through.

💡 Keep a stitch marker on hand at all times since this pattern is worked in continuous rounds without joining, making it easy to lose your place.

💡 Stuff as you go rather than waiting until the piece is fully closed — it's much easier to distribute fiberfill evenly into small sections like the snout during rounds R7-R10.

💡 Block your safety eyes carefully by testing placement with removable eye backs or pins before locking the final washers in place, since this is permanent.

💡 When embroidering the eyebrows, work them after the eyes are set so you can adjust the expression based on how the eyes actually sit on the finished head.

💡 Weave in ends securely with a yarn needle by running them through several stitches in different directions to prevent unraveling with handling over time.

FAQs

Frequently asked questions

What size will my finished hippo be?

This pattern creates a hippo approximately 13-14 cm (5.1-5.5 inches) tall when made with worsted weight yarn and a standard amigurumi hook. Using a different yarn weight will change the final size proportionally.

Can I use embroidery floss instead of yarn for the eyebrows?

Yes, either black yarn or embroidery floss works beautifully for the eyebrows, and the materials list specifically offers both as options. Embroidery floss gives a slightly finer, more delicate line if you prefer that look.

Do I need safety eyes, or can I embroider the eyes instead?

The pattern is designed around 5mm safety eyes for a clean, professional finish, but you can substitute embroidered eyes if the toy is intended for a very young child. Just keep in mind embroidered eyes give a softer, less defined look.

How much fiberfill will I need?

The exact amount isn't specified, but for a hippo this size, one standard bag of polyester fiberfill is typically more than enough. Stuff firmly in small amounts as you work through each section for the best shape.

Is this pattern beginner-friendly?

This pattern is rated intermediate because it involves careful shaping across many rounds with increases and decreases, plus finishing details like safety eyes and embroidery. A confident beginner who has made a few simple amigurumi pieces before should be able to handle it with patience.

One at a time —

Get the next pattern

Tested round by round before it is sent. No spam.