Made and counted by Wren —

Amigurumi fox pattern tested round by round

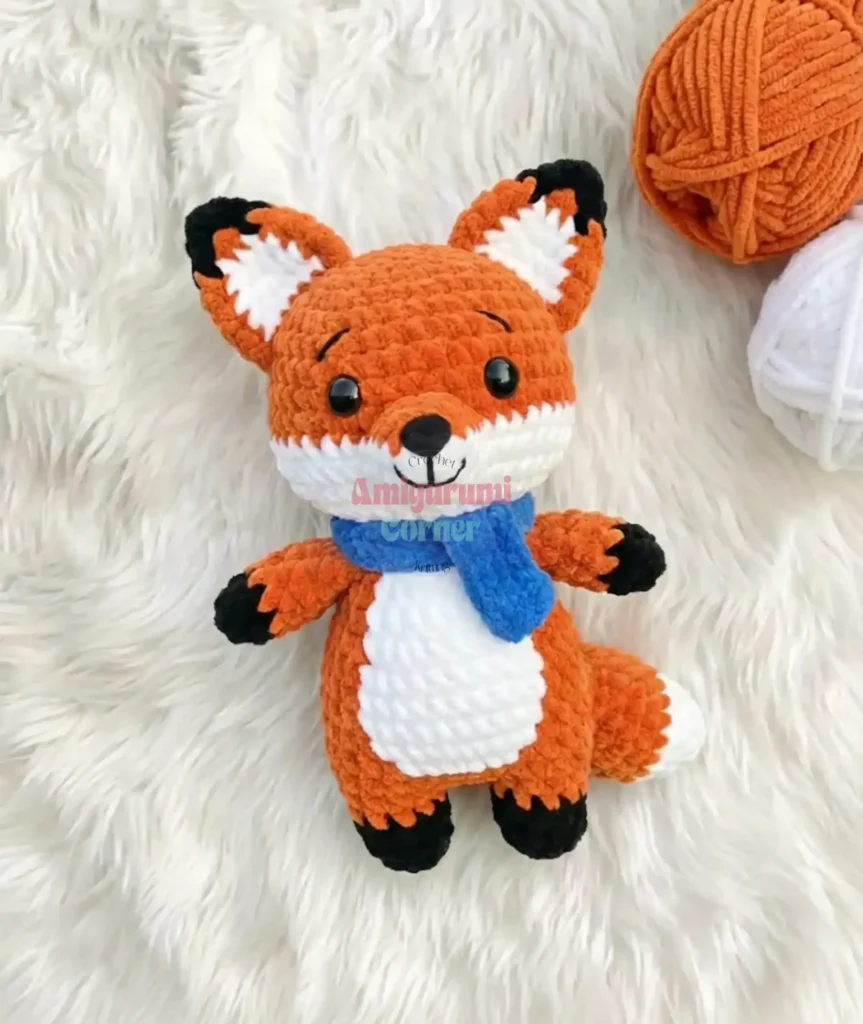
4-5mm hook, chunky yarn: amigurumi fox with sewn snout, color-blocked paws.

Amigurumi fox pattern tested round by round
IntermediateLevel
4-6 hoursTime
5 mmHook
ChunkyYarn
Jump to the pattern

About this pattern

This pattern makes an amigurumi fox with a continuously crocheted orange head, a separately worked white snout sewn between rounds 12–15, black paw and ear-tip pieces, and 12 mm safety eyes. Head and body each finish at 18 rounds with 18 stitches in the last round. Hook size runs 4–5 mm for chunky yarn, and fiberfill stuffing is required throughout.

This amigurumi fox builds the head first, working in continuous rounds from a magic ring to 42 stitches by round 6, then holding at 42 through rounds 7–9 before shaping. The snout, legs, and ear tips crochet as separate color-blocked pieces in white and black, sewn on after stuffing. The 42-stitch head round is the number to watch — it sets the circumference for the snout attachment and the eye placement for 12 mm safety eyes.

The pattern

Written out round by round

Materials

To create your fox, gather these supplies before starting

  • Crochet hook 4–5 mm (suitable for chunky yarn)
  • Stitch marker
  • Scissors
  • Yarn needle
  • Fiberfill for stuffing
  • Safety eyes 12 mm

Recommended yarn

  • Himalaya Dolphin Baby or equivalent chunky yarn

Alternative brands

  • Yarn Art, Premier Parfait, or any similar chunky weight yarn

Color palette

  • 🧡 Orange – main body color
  • ⚪ White – face, chest, and tail tip
  • ⚫ Black – paws and ear tips
  • 💙 Blue – scarf (optional accessory)
  • 💗 Pink – rosy cheeks

Abbreviations

  • Mr = magic ring
  • Sc = single crochet
  • Inc = increase
  • Dec = invisible decrease
  • * (…)n = repeat n times
  • Slst = slip stitch
  • Ch = chain
  • Hdc = half double crochet
  • Dc = double crochet

Crocheting the Head

Start with orange yarn for the main head structure.

Round 1Mr 8sc (8) Round 2: 8inc (16) Round 3: (sc, inc)*8 (24) Round 4: (3sc, inc)*6 (30) Round 5: 2sc, inc, (4sc, inc)*5, 2sc (36) Round 6: (5sc, inc)*6 (42) Rounds 7–9: 42sc (42)

Step by step: Do not cut yarn – you’ll use this to continue.

Making the Snout

Switch to white yarn for the adorable muzzle.

Round 1Mr 6sc (6) Round 2: 6inc (12) Round 3: (sc, inc)*6 (18) Round 4: 18sc (18) Round 5: 18sc (18)Fasten off and stuff lightly – you want the snout to have shape but remain soft and subtle.Assembly instructions: Sew the snout to the head between rounds 12–15. Embroider a small black triangle nose on the snout between rounds 2–3. Add pink cheeks by sewing small pink circles beside the eyes for that extra touch of sweetness.

First Leg

Begin with black yarn for the paw.

Round 1Mr 5sc (5) Round 2: 5inc (10) Rounds 3–4: 10sc (10)Fasten off and cut yarn.

Black Paw Section

Round 1Mr 4sc (4) Round 2: 4inc (8) Round 3: 8sc (8)

Black Ear Tip

Round 1Mr 4sc (4) Round 2: 4inc (8)

Optional Inner Ear Detail (White) – Make 2

For added dimension and realism:

Round 1Mr 3sc (3) Round 2: 3inc (6) Round 3: (sc, inc)*3 (9)Fasten off. Flatten into a small triangle and sew inside each ear, slightly below the black tip.

White Tip

Round 1Mr 6sc (6) Round 2: 6inc (12) Round 3: (sc, inc)*6 (18) Round 4: (2sc, inc)*6 (24) Round 5: 24sc (24)

Adding a Cozy Scarf (Optional)

Give your fox extra personality with a simple crocheted scarf in blue or your color of choice.

Ch 40 (or desired length).

Round 1Sc in 2nd ch from hook, sc across (39) Row 2: Ch 1, turn, sc across (39) Row 3: Ch 1, turn, sc across (39)

Fasten off. You can add fringe at both ends if you like for extra texture.

Change to Orange

Round 3(sc, inc)*4 (12) Round 4: (3sc, inc)*3 (15) Rounds 5–6: 15sc (15)Fasten off.Shaping: Flatten each ear into a triangle. Sew the ears to the head between rounds 3–6 with the orange side at the base (bottom) and the black side as the ear tip (top) .

Orange Arm Section

Rounds 4–78sc (8)Fasten off and leave a long tail for sewing. Arms can be left unstuffed or lightly stuffed depending on your preference.Attachment: Sew the arms to the body around round 15.

Change to Orange

Rounds 6–824sc (24) Round 9: (2sc, dec)*6 (18) Rounds 10–11: 18sc (18) Round 12: (sc, dec)*6 (12) Rounds 13–14: 12sc (12) Round 15: (sc, dec)*4 (8) Rounds 16–17: 8sc (8) Round 18: 4dec (4)Fasten off and close the opening. Stuff the tail very firmly to make it fluffy and proud. Sew the tail to the back of the body between rounds 7–9.

Creating the White Face Markings

Now you’ll add the distinctive white facial markings that give your fox its character:

Round 1012sc orange, 18sc white, 12sc orange (42) Round 11: 11sc orange, 20sc white, 11sc orange (42) Round 12: 10sc orange, 22sc white, 10sc orange (42) Round 13: 10sc orange, 22sc white, 10sc orange (42) Round 14: 11sc orange, 20sc white, 11sc orange (42)

Important: Insert safety eyes between rounds 11–12, spacing them 8 stitches apart.

Adding the White Chest

Round 138sc orange, 16sc white, 8sc orange (32) Round 14: 8sc orange, 16sc white, 8sc orange (32)

Shaping the Head

Round 15(5sc, dec)*6 (36) Round 16: 2sc, dec, (4sc, dec)*5, 2sc (30) Round 17: (3sc, dec)*6 (24) Round 18: sc, dec, (2sc, dec)*5, sc (18)Fasten off and stuff the head very firmly for best results.

Assembly

Step 1Embroidery Details: Bring your fox to life with these finishing touches: Eyebrows: Use dark orange or brown yarn above the eyes for expression
Step 2Smile: Embroider a small smiling mouth with black yarn
Step 3Optional details: Add a small line from nose to mouth for extra character

Tester's notes

4–5 mm hook: size up half a step if orange rounds 1–6 of the head curl inward; size down if stitches gap between round 3 and round 4.

12 mm safety eyes: place them before stuffing the head, since rounds 7–9 close off easy access once stuffing begins.

Stitch marker: move it every round on the head's increase rounds, 2 through 6 — losing the round start makes the final 42-stitch count unreliable to check.

Stuffing: pack the head firmly before closing it, but keep the snout soft and subtle as instructed — overstuffing it distorts the seam sewn between rounds 12 and 15.

At a glance

Rounds14
Parts14
LevelIntermediate
Time4-6 hours
Hook5 mm
YarnChunky

Gauge check

After round 6 of the head, count stitches before moving on — 42 is the target, and the circle should lie flat without cupping or rippling.

If the count is off, redo the round rather than continuing, since every round from 7 to 9 depends on that 42-stitch base holding steady.

Stitch-count checkpoints

  • Crocheting the Head · Round 1: 42 sts
  • Making the Snout · Round 1: 18 sts
  • First Leg · Round 1: 10 sts
  • Black Paw Section · Round 1: 8 sts
  • Black Ear Tip · Round 1: 8 sts
  • Optional Inner Ear Detail (White) – Make 2 · Round 1: 9 sts

If something looks wrong

The head looks lumpy or uneven going into round 7.
Increases from round 2 (8 to 16) through round 6 (36 to 42) landed unevenly spaced. Recount each increase round against its target before starting the next one.
The snout won't sit flush against the face.
It's being sewn outside the rounds 12–15 range on the head. Reposition it within that range before securing the seam.
Ears or the inner ear detail pieces flare instead of cupping.
The white inner ear detail (make 2) was stuffed or sewn too full for a piece this small. Skip stuffing it and tack it flat against the black ear tip instead.

Yarn substitutions

Acrylic, chunky weightKeeps the 4–5 mm hook and stitch counts unchanged; stiffer hand gives less drape through the 42-stitch head rounds.
Cotton-blend, worsted weightDrops the hook to roughly 3.5–4 mm for similar density; adds stitch definition on the color-block paw and snout sections but reduces squish for stuffing.
Wool-blend, bulky weightSizes the hook up to around 6 mm, so fewer rounds are needed to reach the same finished head circumference; takes stuffing well but requires hand washing per the care notes.
FAQs

Questions

Can the scarf and other optional pieces be skipped?

Yes. The scarf, the optional inner ear detail, and the embroidered nose-to-mouth line are all marked optional and don't affect the head, snout, or leg stitch counts.

What size are the finished head and body?

Both finish at 18 rounds with 18 stitches in the final round, per the pattern's stated dimensions. Actual width depends on the yarn weight and hook size used.

When should the safety eyes go in?

Insert the 12 mm safety eyes into the head before stuffing it, since the snout is sewn on afterward between rounds 12–15 and blocks easy access once attached.

One at a time —

Get the next pattern

Tested round by round before it is sent. No spam.