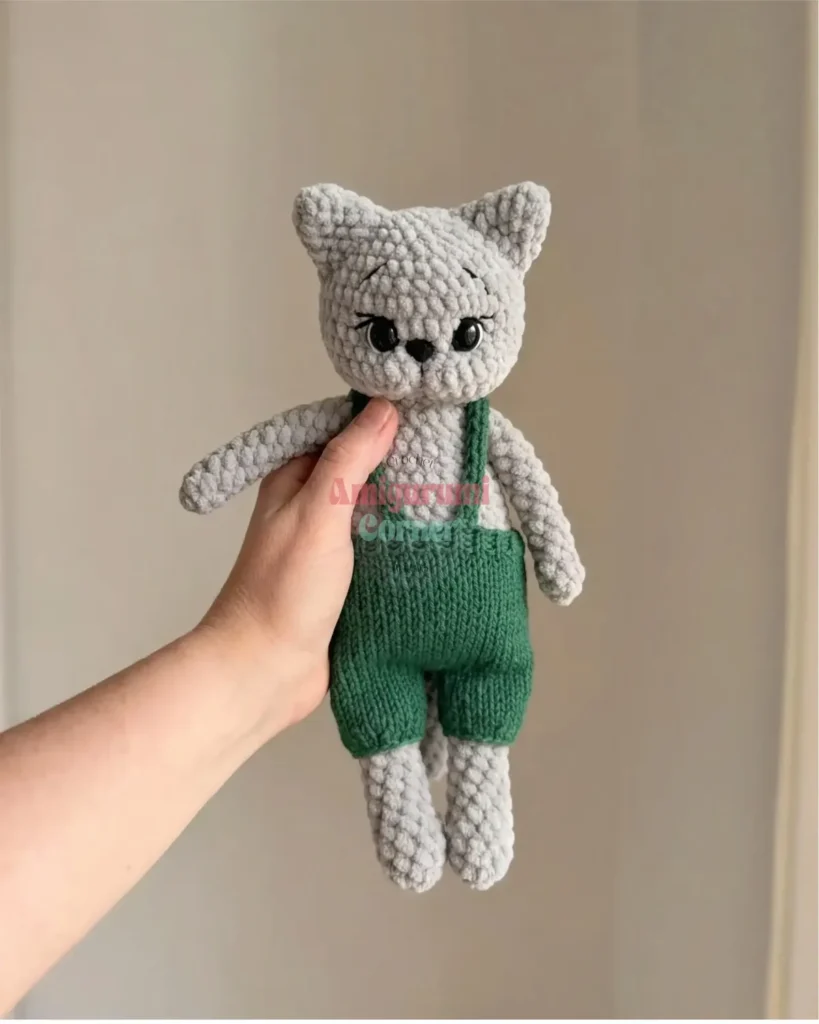
Made and counted by Wren —

Amigurumi cat crochet pattern with knitted overalls

3.5-4mm hook, bulky chenille yarn: crochet an amigurumi cat body with knitted DK-cotton overalls.

Amigurumi cat crochet pattern with knitted overalls
IntermediateLevel
6-9 hoursTime
4 mmHook
BulkyYarn
Jump to the pattern

About this pattern

This pattern makes a crocheted amigurumi cat dressed in knitted overalls, worked in continuous spiral rounds with a stitch marker to track each start. The body and head take polyfill stuffing and 12-14mm safety eyes with a 10mm nose; arms, ears, and tail stay flat and unstuffed. A 3.5-4mm hook handles the bulky chenille body, while a 2mm needle knits the DK-weight cotton overalls.

This amigurumi cat combines crocheted body parts with knitted overalls, built from continuous spiral rounds with no joins. Arms run 15 rounds and the tail runs 14, both closing with sc3 through flattened, unstuffed layers; ears flatten too, building from a 4-stitch magic ring up to 12 stitches by round 6. The head and body get firm polyfill stuffing before closing, then take 12-14mm safety eyes, a 10mm nose, and black-and-white embroidered features. The count that matters most: every round after the magic ring holds its stitch total exactly, since nothing here decreases.

The pattern

Written out round by round

Materials

  • 1 skein Dolphin Baby yarn or equivalent bulky chenille yarn

Crochet hook

  • 3.5–4 mm (US E/4–G/6)

Safety eyes

  • 12–14 mm (× 2)

Safety nose

  • 10 mm (× 1)
  • Polyfill stuffing
  • Yarnart Jeans yarn in black and white (for face embroidery)
  • Tapestry needle
  • Scissors
  • Gazzal Baby Cotton yarn or equivalent DK-weight cotton yarn

Knitting needles

  • 2 mm (US 0)

Abbreviations

  • ch = chain
  • sc = single crochet
  • inc = increase
  • dec = decrease
  • mr = magic ring
  • rnd = round
  • rnds = rounds

Arms — Make 2

Round 16 sc in mr. (6) Rnd 2–15: 6 sc. (6)Flatten the piece. Sc 3 through both layers to close. Do not stuff. Leave a long tail for sewing.

Ears — Make 2

Round 14 sc in mr. (4) Rnd 2: (inc) × 4. (8) Rnd 3: 8 sc. (8) Rnd 4: (3 sc, inc) × 2. (10) Rnd 5: (4 sc, inc) × 2. (12) Rnd 6: 12 sc. (12)Flatten. Do not stuff. Leave a long tail for sewing.

Tail — Make 1

Round 15 sc in mr. (5) Rnd 2–14: 5 sc. (5)Flatten the piece. Sc 3 through both layers to close. Do not stuff. Leave a long tail for sewing.

Legs — Make 2

This entire section (legs, body, and head) is worked as one continuous piece, beginning with both legs and moving through the body and head without fastening off.

Round 16 sc in mr. (6) Rnd 2: (1 sc, inc) × 3. (9) Rnd 3–16: 9 sc. (9)First leg only: Fasten off and trim yarn after Rnd 16. Complete the second leg through Rnd 16. Do not fasten off — continue directly into the body.

Body

Join legs by chaining 3 across, then crocheting across both legs and the chain bridge to begin the body.

Round 179 sc across second leg, 3 sc across ch-3 bridge, 9 sc across first leg, 3 sc across opposite side of ch-3 bridge. (24) Rnd 18: 4 sc, inc, 4 sc, inc, 1 sc, inc, 4 sc, inc, 4 sc, inc, 1 sc, inc. (30) Rnd 19: (4 sc, inc) × 6. (36) Rnd 20–24: 36 sc. (36) Rnd 25: 12 sc, dec × 4, 16 sc. (32) Rnd 26: 32 sc. (32) Rnd 27: 12 sc, dec × 2, 16 sc. (30) Rnd 28–30: 30 sc. (30) Rnd 31: (3 sc, dec) × 6. (24) Rnd 32: 24 sc. (24) Rnd 33: (2 sc, dec) × 6. (18) Rnd 34: 18 sc. (18)Attach Arms Now: Position both arms on opposite sides of the body before working Rnd 35. In Rnd 35, join each arm by working sc simultaneously through the body stitches and the flattened arm stitches, crocheting through both layers at once.
Round 353 sc, [4 sc joining first arm through both layers], 5 sc, [4 sc joining second arm through both layers], 2 sc. (18) Rnd 36: (1 sc, dec) × 6. (12)Begin stuffing the body firmly. Sew the tail to the back before closing.

Head

Continue directly from the body without fastening off.

Round 3712 sc. (12) Rnd 38: (inc) × 12. (24) Rnd 39: (3 sc, inc) × 6. (30) Rnd 40: (4 sc, inc) × 6. (36) Rnd 41: (5 sc, inc) × 6. (42) Rnd 42–46: 42 sc. (42)Insert safety eyes and safety nose now , before the opening becomes too small to work comfortably. Position eyes between Rnds 42–44, spaced approximately 8–10 stitches apart. Place the nose centered below, between the eyes.
Round 47(5 sc, dec) × 6. (36) Rnd 48: 36 sc. (36) Rnd 49: (4 sc, dec) × 6. (30) Rnd 50: (3 sc, dec) × 6. (24) Rnd 51: (2 sc, dec) × 6. (18) Rnd 52: (1 sc, dec) × 6. (12)Stuff the head firmly before closing.
Round 53dec × 6. (6)Fasten off. Close the remaining opening with a tapestry needle by weaving through the front loops and pulling tight. Weave in the end securely.One of the most distinctive features of this cat is its sculpted face, achieved through a thread-pulling technique. Using a length of matching yarn threaded on a tapestry needle: thread exits at Point 1, insert and exit at Point 3; from Point 3, insert and exit at Point 4; from Point 4, insert and exit at Point 2; from Point 2, insert and exit at Point 5; from Point 5, insert and exit at Point 6; from Point 6, insert and exit at Point 1; from Point 1, pass the needle along the surface of the head (not through the interior) to Point 7, then exit at Point 1. Pull firmly to cinch. Repeat the entire sequence if the shaping is not deep enough on the first pass. Once satisfied, embroider whiskers, eyelashes, and any muzzle details using black and white yarn. Finish by sewing the ears securely to the top of the head.

Assembly

Step 1Bringing all the pieces together is the most rewarding part of this project. Follow this order for the smoothest results:
Step 2Stuff all three-dimensional pieces — body, head — firmly and evenly before closing.
Step 3Sew the tail to the back of the body before the head is fully closed.
Step 4Attach the ears to the top of the head after all face embroidery is complete.
Step 5Dress the cat in the overalls last, threading the tail through the optional hole if you made one.
Step 6Secure all yarn ends by weaving them deeply into the stuffing so they cannot pull free.

Tester's notes

3.5-4mm (US E/4-G/6) is a range, not a fixed size: size down within it if stitches gap on the bulky chenille.

Use a stitch marker on every piece, since rounds are continuous spiral and never joined; losing track of the round start is easy on long runs like the arm's 15 rounds.

Arms, ears, and tail stay unstuffed and get flattened before closing, so keep tension even across all their rounds or the two layers won't sit flush when sc3 closes them.

Place the 12-14mm safety eyes and 10mm nose and finish face embroidery in black and white Yarnart Jeans yarn before stuffing the head, since there's no adjusting placement after polyfill goes in.

At a glance

Rounds9
Parts6
LevelIntermediate
Time6-9 hours
Hook4 mm
YarnBulky

Gauge check

After round 1, count stitches in each magic ring before moving on: 6 for arms, 4 for ears, 5 for tail, since a slipped or doubled stitch here throws off every plain round that follows.

If the count is off, unravel back to the ring and rework round 1 rather than adjusting later, because arms and tail run 14-15 plain rounds afterward with no decreases to hide an error.

Stitch-count checkpoints

  • Arms — Make 2 · Round 1: 6 sts
  • Ears — Make 2 · Round 1: 12 sts
  • Tail — Make 1 · Round 1: 5 sts
  • Legs — Make 2 · Round 1: 9 sts
  • Body · Round 17: 18 sts
  • Body · Round 35: 12 sts

If something looks wrong

Arms or tail cup instead of lying flat when closed.
A missed or uneven round among the 14 plain rounds (tail) or 15 plain rounds (arms) distorts the flat shape. Recount stitches before the sc3 closure and rework any round that drifted from 6 sc (arms) or 5 sc (tail).
Ears come out tube-shaped rather than flat and curved.
Rounds 4 and 5 each add two increases to bring the count from 8 to 10 then to 12. Skipping or misplacing either increase round leaves the ear tube-shaped; verify 12 sc at round 6 before flattening.
Stitch count creeps up over long plain rounds.
Continuous spiral rounds with no join make it easy to work an extra stitch at the perceived start. Move the stitch marker at the top of every round, especially through the arm's 15-round run, to catch drift early.
Overalls feel too tight or too loose
DK-weight cotton on a 2mm needle runs a different tension than the bulky chenille body. Check the knitted piece against the body's finished width before casting off, since the overalls go on last.

Yarn substitutions

Non-chenille cotton, DK weightReplaces the overalls yarn with smoother stitch definition and less stretch than the original cotton blend. The 2mm needle still works; the knit fabric will show stitch texture more clearly.
Acrylic chenille, bulky weightKeeps the body's soft texture and drape close to the original chenille. The 3.5-4mm hook range still applies, and stuffing fills evenly since bulky chenille forgives slight hook-size changes.
Cotton, worsted weight (non-chenille)Produces a smaller finished cat, since worsted is thinner than bulky chenille. Drop toward the 3.5mm end of the hook range; stitches show more clearly without chenille's halo, so tension errors become visible.
FAQs

Questions

Why are the arms, ears, and tail left unstuffed?

These pieces close flat by sc3 through both layers (arms, tail) or by flattening after the final round (ears), so they fold flush against the body instead of standing round like the stuffed head and body. Stuffing would stop them from sitting flat once sewn on.

What order do the eyes, nose, embroidery, and ears go on?

Place the 12-14mm safety eyes and 10mm nose, then stuff and close the head, then embroider the face in black and white yarn, and attach the ears last once embroidery is finished. Attaching ears first makes judging embroidery placement harder.

What yarn weight is best for this amigurumi cat pattern?

This pattern is designed for bulky chenille yarn, such as Dolphin Baby or any equivalent. Chenille gives the cat its characteristic soft, velvety texture. Using a thinner yarn will produce a smaller finished toy, while a thicker yarn may make the stitches difficult to close neatly. Always adjust your hook size to match your yarn so the fabric is tight enough to prevent stuffing from showing through.

Can I use a different stuffing material instead of Polyfill?

Yes. The original designer uses Hollofil, a polyester fiber filling widely available in craft stores. Standard Polyfill works equally well. For a weighted toy, you can add plastic pellets to the bottom of the legs and lower body before finishing with regular stuffing. Avoid using cotton wool or natural fibers, as these can clump, yellow over time, and may not be washable.

One at a time —

Get the next pattern

Tested round by round before it is sent. No spam.