Made and counted by Wren —

6-inch plush frog amigurumi in velvet yarn

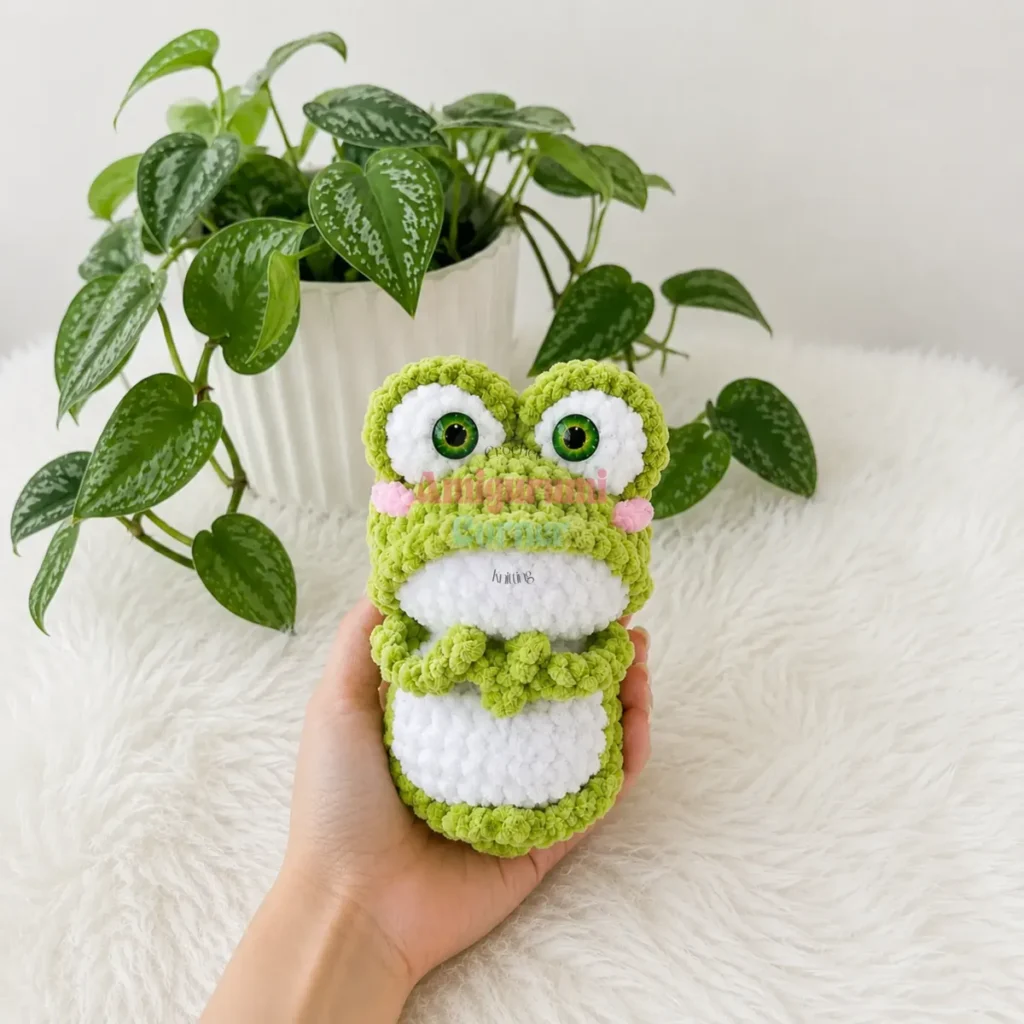
US E-4 (3.5 mm) hook, Super Bulky velvet yarn: 6-inch plush frog amigurumi with cabochon eyes.

6-inch plush frog amigurumi in velvet yarn
IntermediateLevel
4-6 hoursTime
3.5 mmHook
Super BulkyYarn
Jump to the pattern

About this pattern

A 6-inch plush frog amigurumi worked in Super Bulky velvet yarn on a US E-4 (3.5 mm) hook. The body and head form one continuous spiral piece of 25 rounds, with lower legs and fingers built directly into Round 5 using front-loop chains. Two 4-round Eye Whites and two 3-round Eyelids are made separately and sewn on, along with 12 mm cabochon eyes glued in place.

This 6-inch amigurumi frog is worked as one continuous piece from the bottom of the body through the head in 25 rounds, using Super Bulky velvet or velour plush yarn for a dense, color-blocked finish. Lower legs and fingers form directly from Round 5 through front-loop chains, so no separate leg pieces are sewn on later. Two Eye White pieces (4 rounds each) and two Eyelid pieces (3 rounds, left open) complete the face. The number that matters most: 25 rounds of unjoined spiral make up the entire body and head.

The pattern

Written out round by round

Materials

  • Yarn (Main Color / MC): Velvet or velour plush yarn, green — approx. Super Bulky weight (CYCA 6); Wolans Bunny Baby shade 46 or equivalent
  • Yarn (Contrast Color / CC): Velvet or velour plush yarn, white — Himalaya Dolphin Baby shade 80301 or equivalent
  • Yarn (Accent / AC): Velvet or velour plush yarn, pink — LaVita Velur shade 4007 or equivalent, for cheeks
  • Plush/velour yarn in MC , for mouth edging (a separate small amount)

Hook

  • US E-4 (3.5 mm)

Eyes

  • 12 mm green cabochon half-bead eyes, qty 2

Stuffing

  • Polyfill fiberfill
  • Stitch markers , at least 2
  • Tapestry needle (large eye)
  • Strong thread and large needle , for cinching
  • Scissors
  • Clear-drying craft glue (for adhering cabochon eyes and optional lashes)

Optional

  • Doll eyelashes, qty 2

Abbreviations

  • BLO = Back Loop Only
  • ch = Chain
  • dec = Invisible Decrease
  • FLO = Front Loop Only
  • hdc = Half Double Crochet
  • inc = Increase (2 sc in same stitch)
  • MR = Magic Ring
  • Rnd = Round
  • sc = Single Crochet
  • sl st = Slip Stitch
  • SM = Stitch Marker
  • st / sts = Stitch / Stitches

Body & Head (worked as one piece, bottom to top)

Begin with CC (white).

Worked as one continuous piece in a continuous spiral — do not join rounds or chain at the start of each round; move the stitch marker up each round.

The stitch marker runs along the side of the toy; all decreases are centered on the front (belly). Use slip-stitch positioning if needed to realign before a decrease round.

Color changes are worked mid-round; carry unused yarn loosely along the inside or cut and rejoin.

Round 16 sc in MR. (6)
Round 2Inc in each st around. (12)
Round 3Inc in each st around. (24)
Round 4[3 sc, inc] 3 times; change to MC (green); [3 sc, inc] 3 times. (30) Place SM — marker runs along the side of the toy.

Lower Legs are worked in this round.

Round 5Change to CC: 14 sc; change to MC: [FLO: ch 11, starting from 2nd ch from hook — (fingers) sl st 2, ch 3, sl st 2 from hook, ch 3, sl st 2 from hook, then back along remaining ch: sl st 4, sc 1, hdc 3]; 14 sc; [FLO: ch 11, starting from 2nd ch from hook — sl st 2, ch 3, sl st 2 from hook, ch 3, sl st 2 from hook, then back along remaining ch: sl st 4, sc 1, hdc 3]. (30)
Round 6Change to CC: 14 sc; change to MC: BLO sc 1; 14 sc; BLO sc 1. (30)
Rounds 7–9[Change to CC: 14 sc; change to MC: 16 sc] × 3 rounds. (30 each)Marker runs along the side; all decreases are centered on the belly; work slip-stitch adjustments if needed to reposition before the next decrease round.
Round 10Change to CC: 4 sc, dec 3 times, 4 sc; change to MC: 16 sc. (27)
Round 11Change to CC: 11 sc; change to MC: 16 sc. (27)

Upper Arms are worked in this round.

Round 12Change to CC: 11 sc; change to MC: [FLO: ch 11, starting from 2nd ch from hook — sl st 2, ch 3, sl st 2 from hook, ch 3, sl st 2 from hook, then back along remaining ch: sl st 4, sc 1, hdc 3]; 14 sc; [FLO: ch 11, starting from 2nd ch from hook — sl st 2, ch 3, sl st 2 from hook, ch 3, sl st 2 from hook, then back along remaining ch: sl st 4, sc 1, hdc 3]. (27)
Round 13Change to CC: [sc, dec] 3 times, 2 sc; change to MC: [2 sc, dec] 4 times. (20)

Beginning of Head.

Round 14Change to CC: inc 8 times; change to MC: inc 12 times. (40)
Round 15Change to CC: 16 sc; change to MC: 24 sc. (40)
Round 16BLO sc 2; change to CC: 12 sc; change to MC: BLO sc 2; 24 sc. (40)
Round 172 sc, BLO sc 2; change to CC: 8 sc; change to MC: BLO sc 2; 26 sc. (40)
Round 184 sc, BLO sc 1; change to CC: 6 sc; change to MC: BLO sc 1; 28 sc. (40)Fasten off CC after Rnd 18 and weave in end.
Round 195 sc, BLO sc 6, 29 sc. (40)
Rounds 20–21Sc in each st around. (40) × 2 rounds
Round 22[4 sc, dec] 6 times, 2 sc, dec. (33)
Round 23[2 sc, dec] 8 times, 1 sc. (25) Begin stuffing.
Round 24[Sc, dec] 8 times, 1 sc. (17)
Round 25Dec 9 times, continuing into next round. (8)Close opening and fasten off after Rnd 25, leaving a tail of approximately 1 yard (1 m) for mouth edging.
Eye White (make 2)

Make 2

Worked in CC (white).

Lightly stuff if desired. Close opening. Fasten off and weave in end.

Round 16 sc in MR. (6)
Round 2[Sc, inc] 3 times. (9)
Round 3Sc in each st around. (9)
Round 4[Sc, dec] 3 times. (6)

Eyelid (make 2)

Make 2

Worked in MC (green).

Fasten off and weave in end. Sew eyelid to eye white using sewing thread. Repeat for second eye.

Round 1Ch 4, starting from 2nd ch from hook: inc 2 times, 4 sc in one stitch, working along the back of foundation chain: inc 2 times. (12)
Round 2[Sc, inc] 6 times. (18)
Round 39 sc. Do not complete the round.

Assembly

Step 1Mouth edging: Using the long yarn tail left after closing the head and a length of plush yarn in MC, work sc evenly around the mouth opening into the remaining front loops left exposed from the BLO rounds. Fasten off and weave in all ends.
Step 2Mark cinch points: Place stitch markers as follows — Markers 1 between Rnds 23–24, spaced 3–4 sts apart (inner eye sockets); Markers 2 between Rnds 21–22, spaced 11–12 sts apart (outer eye ridge).
Step 3Face cinching: Using strong thread and a large needle, insert at A → exit at B → insert at C → exit at A → insert at D → exit at E → insert at F → exit at D (path: A–B–C–A–D–E–F–D). Pull firmly for symmetrical indentations. Fasten securely. Repeat until indentations are deep enough to seat the eyes.
Step 4Attach eyes: Glue cabochon pupils onto eye whites. Position assembled eyes into the cinched indentations and sew in place using sewing thread.
Step 5Belly cinching: Insert needle at A (center of MR at base) → exit at B (between Rnds 10–11) → insert at C → exit at A (path: A–B–C–A). Pull firmly. Do not cut thread — continue directly to bottom cinching.
Step 6Bottom cinching: Insert needle at A (MR center) → exit at B (between Rnds 10–11) → tie off at A (path: A–B–A). Pull firmly. Fasten off.
Step 7Cheeks: Using pink accent yarn and a tapestry needle, embroider 2–3 straight stitches on each cheek area.
Step 8Lashes: Glue doll eyelashes above the eyes (optional).
Step 9Weave in all remaining ends.

Tester's notes

US E-4 (3.5 mm) hook is specified for this weight of velvet/velour yarn; sizing down slightly keeps the bulky fiber from leaving gaps.

2 stitch markers minimum: one tracks the spiral side seam starting at Rnd 4, the rest mark cinch points between Rnds 21–22 and 23–24 during assembly.

25 rounds of unjoined spiral make up Body & Head; mark Rnd 1 clearly since there is no join point to count from later.

Stuff before cinching: pack fiberfill firmly enough that the Super Bulky plush fabric does not show gaps once the head is closed and the face is cinched. Stuff gradually as you work — begin stuffing at approximately Rnd 23.

This pattern is written in US crochet terminology.

Gauge is not critical for this project, but working tightly will prevent fiberfill from showing through.

Stitch count is given at the end of each round in parentheses: (##).

MC = green; CC = white.

Cabochon eyes are glued in place, not secured with posts, so keep small children in mind when gifting.

Finished size is approximately 6 inches (15 cm) tall when made with the recommended Super Bulky velvet plush yarn.

At a glance

Rounds29
Parts3
LevelIntermediate
Time4-6 hours
Hook3.5 mm
YarnSuper Bulky

Gauge check

Check Round 3 (24 sts) for a fabric tight enough that no gaps show between stitches when the piece is stretched slightly over a finger.

If stitches look loose or fiberfill is visible through the plush yarn, drop to a hook smaller than the US E-4 (3.5 mm) called for and re-test Round 3.

Stitch-count checkpoints

  • Body & Head (worked as one piece, bottom to top) · Round 10: 27 sts
  • Body & Head (worked as one piece, bottom to top) · Round 16: 40 sts
  • Body & Head (worked as one piece, bottom to top) · Round 25: 8 sts
  • Eye White (make 2) · Round 1: 6 sts
  • Eye White (make 2) · Round 2: 9 sts
  • Eye White (make 2) · Round 3: 9 sts

If something looks wrong

Fingers on the lower legs look twisted
The fingers are formed from an FLO chain of 11 worked from the 2nd ch from hook; a miscount here skews the shape, so recount the chain and restart the sl st/ch sequence from the correct starting chain.
Fiberfill or stitch definition shows
This comes from gauge that is too loose for Super Bulky plush yarn; re-check that Round 3 reads 24 sts and drop to a smaller hook if the fabric still gaps.
Decrease rounds land on the side of the
The stitch marker has drifted out of position; use a slip stitch to realign the marker to the front before working the next decrease round, as the pattern's spiral note directs.
The Eyelid piece will not sit flush and
This is by design — Rnd 3 of the Eyelid stops at 9 sc with instructions to not complete the round, leaving a flat open edge meant to be sewn flat against the Eye White rather than closed.

Yarn substitutions

Acrylic chenille, Bulky (CYCA 5)Produces a slightly smaller, softer-draping frog than the original Super Bulky velvet; firmer stuffing is needed to hold shape, and a hook up to F-5 (3.75 mm) may better match stitch density.
Cotton-blend velour, Worsted (CYCA 4)Finished frog comes out smaller than 6 inches with crisper stitch definition; drop one hook size from the US E-4 (3.5 mm) specified to keep fiberfill from showing through the thinner fabric.
Polyester plush/minky-style yarn, Super Bulky (CYCA 6)Closest match to the original fiber and weight; the stated US E-4 (3.5 mm) hook and stuffing amount hold without adjustment.
FAQs

Questions

Why are the lower legs worked into Round 5 instead of made as separate pieces?

Working the legs and fingers directly into Round 5 keeps the body as one continuous piece with nothing extra to sew on later. The FLO chains build the leg and finger shapes without breaking the spiral started in Round 1.

How many stitch markers does this pattern actually need?

least 2 stitch markers are needed. One tracks the spiral side seam from Round 4 onward, and the rest are used during face assembly to mark cinch points for the inner eye sockets and outer eye ridge.

Can Round 3 of the Eyelid be completed instead of stopping at 9 sc?

No. Round 3 is written to stop at 9 sc and leave the round unfinished, creating a flat open edge for sewing against the Eye White. Completing the round would close that flat section and prevent the eyelid from sitting correctly.

One at a time —

Get the next pattern

Tested round by round before it is sent. No spam.