Made and counted by Wren —

Vintage sailor bonnet crochet pattern with ribbed crown

4 mm hook, worsted yarn: vintage sailor bonnet with ribbed crown, 61 sc around after shaping.

Vintage sailor bonnet crochet pattern with ribbed crown
IntermediateLevel
4-6 hoursTime
4 mmHook
WorstedYarn
Jump to the pattern

About this pattern

A sailor-style bonnet with a ribbed crown worked in 21 rows of back-loop single crochet, followed by 61 single crochet stitches picked up around the sides and back over 14 total rounds. Requires a 4 mm hook, worsted-weight yarn, and stitch markers to track row starts. Finished top piece measures about 13 cm by 9 cm, and the sides finish 18–19 cm long.

This vintage-inspired sailor bonnet builds from a ribbed top piece worked in 21 rows of back-loop single crochet, then turns to pick up 61 sc around the sides and back for the shaping rounds. The top piece measures roughly 13 cm by 9 cm before assembly, and the finished sides run 18–19 cm. A 4 mm hook and worsted-weight yarn keep the ribbing even, and stitch markers track the first stitch of every row so the edge stays straight through all 14 rounds of the full pattern.

The pattern

Written out round by round

Materials

  • Acrylic yarn (or any yarn of your preference, such as merino wool or mohair)
  • Crochet hook suitable for your yarn (4 mm recommended)
  • Stitch markers (bobby pins can be used as an alternative)
  • Weaving needle
  • Measuring tape (optional)
  • Pair of scissors

Abbreviations

  • SC = single crochet
  • ch = chain
  • BLO = back loop only

Main Pattern

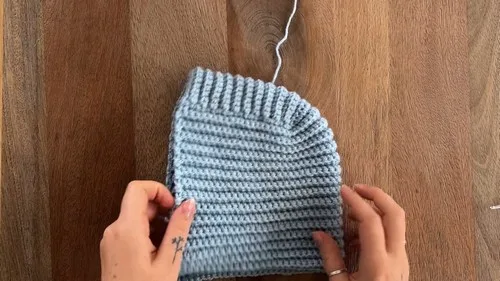
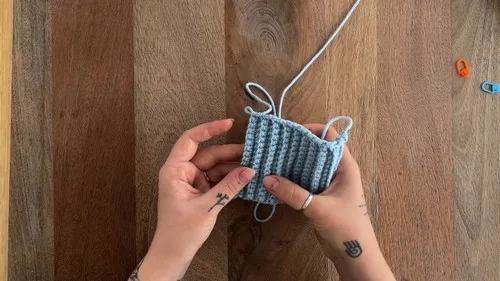
The finished top piece should measure approximately 13 cm long by 9 cm wide.

Total stitch count around the bonnet after shaping the sides and back should be 61 SC.

Finished sides should measure around 18–19 cm.

Optional: add another full round of ribbed SC around the body using BLO if you want a thicker trim.

Round 1Top of the Bonnet – Foundation Row Create a slip knot and place it on your hook; chain 16 stitches for the foundation chain; add one extra chain as a turning chain; begin single crochet (SC) in the second chain from the hook across the row; mark the first SC with a stitch marker. (16 sc)
Rounds 2–21Top of the Bonnet – Ribbed Texture Chain 1 and turn your work at the start of each row; work SC in the back loop only (BLO) across the row; in the last stitch of each row, work through both loops to create a clean edge; use a stitch marker to identify the first stitch of each row; continue for a total of 21 rows.
Round 1(Shaping the Sides and Back – First Side, Vertical Edge): Make a turning chain; work 21 SC along the side of the ribbed piece, alternating between placing stitches "in the row" and "in between the rows"; mark the first stitch. (21 sc)
Round 2(Shaping the Sides and Back – Back, Bottom Edge): Make a turning chain; work 16 SC evenly along the back edge using the back loops; mark the first stitch. (16 sc)
Round 3(Shaping the Sides and Back – Second Side, Opposite Vertical Edge): Chain one and turn; work 21 SC, using the same stitch placement method as the first side; mark the first stitch. (21 sc)
Round 4Body of the Bonnet, Worked in Continuous Rounds Chain one and turn; work 61 SC in a round around the perimeter (sides and back); use BLO for each stitch, except for the last stitch of each round—use both loops there to maintain the edge. (61 sc)
Round 533 (Body of the Bonnet): Continue working in rounds in this manner (BLO for each stitch, both loops in the last stitch of each round); make a total of 30 rounds, or adjust based on your desired bonnet depth. (61 sc)
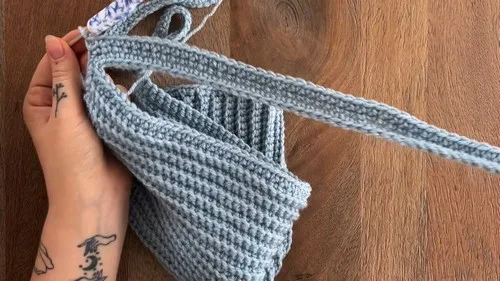
Round 34First Tie Chain 60 (or more for longer ties, minimum 50); chain one extra for turning; SC in each chain starting from the second loop from the hook.
Round 35Frontal Ribbing From the end of the tie, begin working SC along the front edge of the bonnet; alternate between stitching into rows and between rows; continue across the top section as well.
Round 36Second Tie Chain 60 (same as first tie); chain one extra for turning; SC across each chain starting from the second loop.
Round 37Lower Ribbing Continue with SC across the lower edge of the bonnet to meet the starting point of the first tie.
Round 38First Tie – Second Round SC across the edge of the tie; at the final loop, work 3 SC into the same stitch to curve around; continue SC down the opposite side of the tie.
Round 39Ribbed Edging – Front and Bottom Begin working SC in back loop only across the frontal and bottom ribbed sections; this creates a ribbed texture around the bonnet's edge.
Round 40Second Tie – Second Round SC through both loops across the second tie; work 3 SC into the last loop to curve the corner; continue SC down the opposite side.

Assembly

Step 1Fasten off by cutting the yarn and pulling the end through the loop.
Step 2Weave in all loose ends using your needle.
Step 3Optionally block the bonnet to shape and stretch it, especially if using merino or wool-based yarns.

Tester's notes

Stitch markers: move the marker each row onto the first BLO stitch, since losing track of row starts is the most common cause of a skewed 21-row rib panel.

Tension: work the BLO single crochet evenly across all 21 rows, since this determines whether the 61-sc total around the sides and back comes out even.

Colour changes: none are used in this pattern; if adding a contrast band, break yarn at the start of a round rather than mid-row to keep the last-stitch-both-loops edge clean.

Stuffing: none required, since the bonnet is unstuffed and relies on the optional blocking step, not fill, to hold its curve.

Work in progress

Vintage sailor bonnet crochet pattern with ribbed crown — photo 2
Vintage sailor bonnet crochet pattern with ribbed crown — photo 3
Vintage sailor bonnet crochet pattern with ribbed crown — photo 4

At a glance

Rounds14
LevelIntermediate
Time4-6 hours
Hook4 mm
YarnWorsted

Gauge check

After completing the 21 rows of ribbing, lay the piece flat and check that the 16-sc foundation width measures close to 9 cm.

Stitch-count checkpoints

  • Main Pattern · Round 1: 21 sts
  • Main Pattern · Round 3: 21 sts
  • Main Pattern · Round 5: 61 sts

If something looks wrong

The ribbed top piece measures narrower than 9 cm.
Tension is tighter than the pattern's 4 mm hook and worsted-weight pairing; try one hook size up, or check that only the back loop is being caught on each stitch.
Stitch count drifts away from 16 sc partway through the ribbing rows.
A stitch is being skipped or added at the turn; recount after each row and confirm the last stitch of the row is worked through both loops, not BLO.
The side panel doesn't reach 21 sc along the vertical edge.
Stitches were placed only 'in the row' instead of alternating with 'in between the rows'; rework the edge alternating both placements evenly.
Total stitch count around the bonnet is off from 61 sc after the shaping rounds.
One of the three edges (21, 16, 21) was miscounted; recount each side separately before continuing past round 3.

Yarn substitutions

Merino wool, worsted weightDrapes softer than acrylic and blocks firmer; hook size stays at 4 mm, but blocking becomes a useful step rather than optional.
Mohair blend, light weightProduces a fuzzier, less defined rib across the 21 rows of texture; sizing down to a 3.5 mm hook helps keep stitch definition.
Cotton, worsted weightHolds shape without blocking but has less stretch, so the 61-sc side-and-back total may need slight easing to fit; hook stays 4 mm.
FAQs

Questions

Why does the pattern work back loop only for the ribbing?

Working BLO across all 21 rows raises the ridge that creates the ribbed texture. The last stitch of each row is worked through both loops instead, which keeps that one edge flat for seaming later.

What if the side panel doesn't reach exactly 21 sc?

The vertical edge picks up stitches by alternating between the row itself and the gap between rows. Recount before moving to the 16-sc back edge so the final 61-sc total stays accurate.

Is blocking necessary for this bonnet?

Blocking is listed as optional in the assembly steps, but it helps set the curve of the sides after they reach the 18–19 cm finished length, especially with merino or wool yarns.

One at a time —

Get the next pattern

Tested round by round before it is sent. No spam.