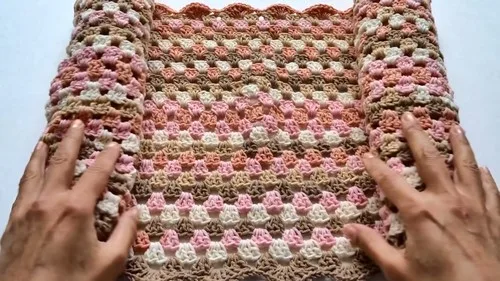
Made and counted by Wren —

Crochet Table Runner Pattern With Simple Shell Border

Crochet a beautiful table runner with a simple shell border. This written pattern uses easy double crochet rounds and cotton yarn for a lasting heirloom.

Crochet Table Runner Pattern With Simple Shell Border
IntermediateLevel
6-8 HoursTime
4.5 mmHook
WorstedYarn
Jump to the pattern

At a glance

Chain a long foundation row in a multiple of 4 plus 3, then work the first row of double crochet clusters separated by chain-1 gaps.

Close the foundation row into a loop with a slip stitch so you can build outward on all four sides at once.

Work the second round by filling each chain-1 space with three double crochets, adding an expanded corner sequence at each end.

Repeat the same expanding round over and over, letting the rectangle grow wider and longer with every pass around the edges.

Keep corner chain spaces loose and joining slip stitches relaxed so the runner stays flat instead of curling.

Continue the expanding rounds until the runner reaches your desired width between the corners.

Fasten off and weave every loose end along the back loops so the front stays clean and lace-like.

About this pattern

This crochet table runner starts as a long foundation chain and grows outward into a beautifully textured rectangle framed by a scalloped shell border. What makes it special is the way each round builds on chain spaces rather than stitch tops, creating an airy, lace-like structure that still feels sturdy enough for daily use. It's perfect for crocheters who love a project that looks far more impressive than it actually is to make, and for anyone wanting a handmade centerpiece for their dining or coffee table.

The core technique here is working double crochet clusters into chain-1 and chain-3 spaces, building corners with expanding chain-3 spaces so the runner grows evenly on all sides. You'll want basic comfort with chains, double crochet, single crochet, and slip stitch joins before starting, since counting chain spaces accurately matters more than raw stitch skill. Time depends entirely on how long you make your foundation chain: the base row and second round take the longest, since the counting matters most there, but once you reach round three the work moves quickly and predictably.

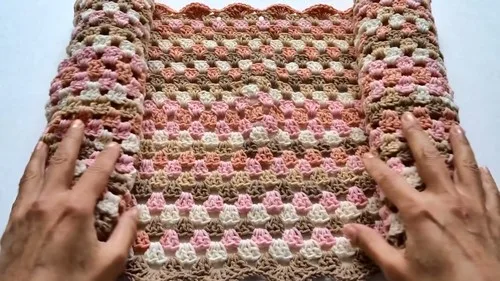
The finished sample measures 55 inches long by 14 inches wide, worked over a total of 14 rounds plus the shell border; the expanding body rounds alone reach roughly 11 inches across between the corners before the shell border round adds a soft, wavy edge of alternating single crochet and seven-stitch shell fans. Worked in a soft cotton blend like Blush and Bloom, it has a gentle drape and cool, crisp hand that feels wonderful under dishes or as a table centerpiece. It also makes a thoughtful handmade gift for housewarmings, weddings, or anyone who appreciates a table dressed with real craftsmanship.
Variations

I adore this table runner because it turns a single long foundation chain into something that looks genuinely intricate without ever asking you to learn a fussy new stitch. Every round is built from double crochet worked into chain spaces, so the fabric grows in these satisfying, lacy clusters that seem to multiply as you go. Watching the corners expand round after round, with their little chain-3 pockets, is oddly meditative — you can practically see the rectangle taking shape in your hands. Then that final shell border round is the real payoff: alternating single crochets with big, fanned seven-double-crochet shells gives the whole runner this soft, scalloped silhouette that instantly reads as heirloom-quality. I love that it uses simple stitches from start to finish — no popcorns, no bobbles, nothing tricky — yet the finished texture fools everyone into thinking it took far more skill than it did. It's the kind of project you can chat or watch TV through, and still end up with something you're genuinely proud to set your table with.

Common mistakes

  • Losing count on the long foundationPlace a stitch marker every ten chains as you go so you can quickly verify you've landed on a multiple of 4 plus 3 before starting round 1.
  • Working stitches into the topsRemember that nearly every stitch in this pattern goes into a chain-1 or chain-3 space, not into a stitch top — always look for the little loop of chain to insert your hook into.
  • Pulling the corner chain-3 spacesKeep corner chains deliberately loose; if the runner starts curving into a banana shape, that's the telltale sign your corners are too tight.
  • Cinching the closing slip stitchLeave the slip stitch join loose so it doesn't create a visible ridge or pucker where the round closes.
  • Forgetting that the beginning chain-3Only add 2 more double crochets to complete that first 3-dc cluster at the start of each round — adding a full 3 will throw off your stitch count.
  • Mixing up the shell border sequence in the final round.Keep the alternating rhythm clear in your head: chain 1, single crochet, chain 1, seven-dc shell, repeating across each side before working the corner sequence.

The pattern

Written out round by round

Materials

Yarn

  • Number 4 medium weight yarn. Cotton or a cotton blend cake is the ideal choice here, since cotton presses flat and holds a crisp edge on a table surface. The sample uses Caron Cotton Cakes in the shade Blush and Bloom, which shifts colour gradually across the length of the runner without any yarn changes on your part.

Hook

  • 4.5 mm crochet hook.

Notions

  • A tapestry needle for weaving in ends, and a pair of sharp scissors.

Abbreviations

  • ch = chain
  • dc = double crochet
  • sc = single crochet
  • sl st = slip stitch

Main Pattern

Nearly every stitch goes into the chain space created by a chain, not into the top of a stitch.

At the beginning of each round, chain 3 counts as the first dc; only 2 more dc complete the first cluster of three.

Each round closes with a slip stitch into the top of the beginning chain 3; keep the slip stitch loose so the join does not pucker.

Corner spaces hold several clusters at once and look crowded until the next round opens them up.

Keep the foundation chain slightly loose so the first row is easier to work into.

Check that every cluster has exactly 3 dc before moving on.

Stop the body rounds whenever the width suits your table, as long as a full round is finished before starting the border.

  1. Round 1(Foundation Chain and Base Row): Chain 143 (any multiple of 4 plus 3 will work). Work 1 dc into the 5th chain from the hook. Work 1 dc into each of the next 2 chains. Chain 1, then skip 1 chain. Work 1 dc into each of the next 3 chains. Repeat that sequence of chain 1, skip 1, and 3 dc all the way to the end of the row. When you reach the final 4 chains, chain 1, skip 1 chain, and work 1 dc into each of the last 3 chains. Chain 4. Slip stitch into that very last chain where your final dc was placed.
  2. Round 2Chain 3 (counts as first dc). Work 2 dc into the same starting chain 4 space, giving 3 dc in total. Chain 1, then work 3 dc into the next chain 1 space. Repeat chain 1 and 3 dc into each chain 1 space all the way across to the corner space. At the corner chain 4 space, work 3 dc. Chain 3. Work 3 dc into the same corner space. Chain 3. Work 3 dc into that same corner space one final time. Continue along the next long side, working chain 1 and 3 dc into each chain 1 space. Repeat the same corner sequence when you reach the next end loop. Slip stitch to the top of the beginning chain 3 to close the round.
  3. Round 3-14Chain 3, which counts as first dc, and work 2 dc into the same chain 3 space. Chain 1, then work 3 dc into each chain 1 space across the side. At the corner spaces, work 3 dc, chain 3, and 3 dc, keeping the corner groups separated by a chain 1. Slip stitch to the top of the initial chain 3 to close the round. Repeat this expanding round for as many rounds as you like; the sample uses 14 rounds in total, which produces an 11 inch width between the corners.
  4. Round 15(Finishing Border): Chain 3, which counts as first dc, and work 2 dc into the same space. Chain 1, then work 1 sc into the next chain 1 space. Chain 1, then work a shell of 7 dc into the next chain 1 space. Continue alternating along the sides: chain 1, 1 sc in the next space, chain 1, a 7 dc shell in the next space. At the corners, work 4 dc, chain 1, and 4 dc into the corner spaces. Finish the round and fasten off securely.

Assembly

Step 1

Thread your tapestry needle and weave all loose ends along the back loops on the wrong side.

Important notes

Use a stitch marker every ten chains along your foundation row to catch counting errors before they compound through fourteen rounds.

Work corner chain-3 spaces with deliberately loose tension throughout — tight corners are the number one cause of a rippled or banana-shaped runner.

Always slip stitch loosely into the top of the beginning chain-3 to close each round; a tight join creates a visible ridge on the right side.

Because nearly every stitch is worked into a chain space rather than a stitch top, take a moment each round to locate the chain loops before diving in.

The sample's 14 expanding rounds produce an 11-inch width, so if you want a wider runner, plan for extra yarn and additional rounds before starting.

Weave in all loose ends along the back loops on the wrong side with a tapestry needle so the front stays perfectly smooth and lace-like.

Foundation chain is worked in multiples of 4 plus 3, so any chain length matching that formula will work with the pattern repeat.

Count the foundation chain in groups of ten and place a stitch marker at every tenth chain to avoid miscounting.

If the runner starts curving into a banana shape, the corner chains are too tight; work them deliberately loose.

Do not pull the join slip stitch tight at the end of each round, or it will create a visible ridge.

Weave ends along the back loops rather than across the fabric to keep them secure through washing.

Block the finished runner: pin it out damp to the desired dimensions and let it dry fully.

Stay within the number 4 medium weight yarn category and match the hook to the yarn band recommendation if substituting yarn; swatch first if changing weights.

customization: shorten the foundation chain for a smaller table, work fewer rounds and use the same border for placemats, work rounds until width matches length for a square centerpiece, or finish with a simple sc round instead of the shell border for a plainer look.

The finished sample measures 55 inches long by 14 inches wide over the full 14 rounds plus the shell border; adjust your foundation chain length and round count if you want a different finished size for your own table.

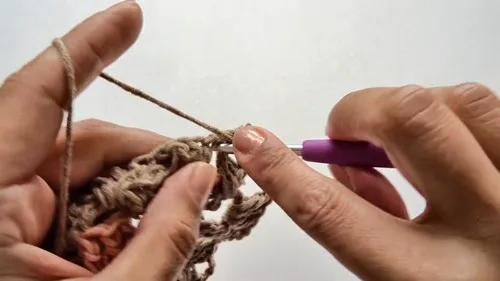
More photos

Crochet Table Runner Pattern With Simple Shell Border — photo 2
Crochet Table Runner Pattern With Simple Shell Border — photo 3
FAQs

Frequently asked questions

What weight yarn works best for this table runner?

A number 4 medium weight cotton or cotton-blend yarn, like the Caron Cotton Cakes used in the sample, gives the best structure and drape. Cotton also holds its crisp shape well for table use and resists stretching over time.

How long does the finished runner end up?

Length depends entirely on how long you make your foundation chain, since it just needs to be any multiple of 4 plus 3. The sample measures 55 inches long by 14 inches wide after 14 expanding rounds and the shell border, so length scales with your starting chain.

Can I make this runner narrower or wider than the sample?

Yes, simply stop the expanding rounds earlier for a narrower runner or add more rounds before the shell border for a wider one. Each expanding round follows the same repeat, so you can adjust the size without changing the stitch pattern.

Why does my runner keep curving instead of lying flat?

This almost always happens when the corner chain spaces are worked too tightly during the expanding rounds. Loosen your tension specifically at the corners and the runner should relax back into a flat rectangle.

What hook size should I use for this pattern?

A 4.5 mm crochet hook is recommended to match the medium weight cotton yarn used in the sample. If your stitches feel too dense or too loose, adjust up or down slightly to get fabric with a nice, even drape.

One at a time —

Get the next pattern

Tested round by round before it is sent. No spam.