Made and counted by Wren —

Crochet Poinsettia Flower Pattern

Learn to crochet a poinsettia flower with vibrant red petals and green leaves—an easy, festive pattern perfect for holiday decor and handmade gifts.

Beginner-IntermediateLevel
1-2 HoursTime
WorstedYarn
Jump to the pattern

At a glance

Start by crocheting a small round center that will anchor all the petals and leaves.

Fasten off or transition into red yarn to begin building the petal layer.

Work the red petals in one continuous round directly from the center piece.

Shape each petal evenly so the bloom looks balanced and full all the way around.

Attach the green leaves evenly around the base to frame the red petals.

Weave in all yarn ends securely so the flower looks tidy from every angle.

Lightly shape or block the finished poinsettia so the petals lie open and flat.

About this pattern

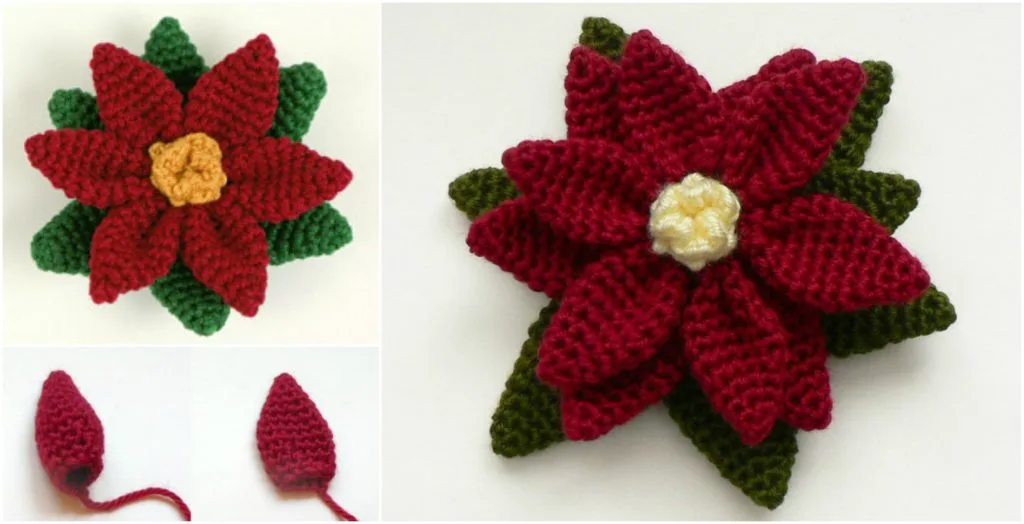
This crochet poinsettia flower captures all the charm of the classic holiday bloom in soft, huggable yarn form. With its bold red petals radiating out from a cozy center and a ring of rich green leaves framing the base, it's the kind of small project that packs a big seasonal punch. It's perfect for crocheters who want a fast, satisfying make to brighten their winter decor, whether you're stitching one flower or a whole bouquet.

The pattern comes together in three simple stages: a small worked center, a round of red petals built up around it, and a finishing round of green leaves attached at the base. You'll use basic stitches along with simple shaping to create petal and leaf shapes, so even confident beginners can tackle this project. Most crocheters can finish a single poinsettia in about an hour or two, making it an ideal quick weekend project.

The finished poinsettia has a full, dimensional look with layered petals that catch the light beautifully, similar in scale to a real poinsettia bloom. It feels sturdy yet soft, ready to be pinned to a wreath, clipped onto a gift, or set out as a table centerpiece that never wilts. Because it's reusable year after year, it makes a thoughtful handmade gift that keeps its festive charm well beyond a single season.

Variations

This poinsettia is a wonderful blank canvas for color play. Try classic red and green Super Saver in Cherry Red and Hunter Green for a traditional look, or go bold with white petals and gold-glittered leaves using Vanna's Glamour for an elegant winter wedding centerpiece. A blush pink and sage green combo (try Bernat Softee Baby) creates a soft, modern take that works beautifully year-round as home decor, not just for the holidays. For a more dramatic effect, work the petals in two shades of red—a deep burgundy for the outer round and a bright red for the inner layer—to mimic the natural gradient of a real poinsettia bloom. To resize, simply add or subtract a few stitches evenly around the flower center round before starting the petals; a smaller center (worked with fewer starting stitches) yields a dainty mini poinsettia perfect for earrings or gift toppers, while a larger starting round creates a statement flower for a wreath focal point. You can also experiment with yarn weight: a fingering weight cotton thread with a small hook makes delicate poinsettias ideal for ornaments, while bulky yarn and a large hook create a plush, oversized bloom for a chunky throw pillow accent. For themed variations, try icy blue and white for a winter wonderland look, or orange and brown petals for a rustic autumn-inspired flower using the same construction. Adding a button or bead center instead of crocheting the middle round is another quick swap for extra sparkle.

I adore how this poinsettia comes together in just three easy stages—start with a tidy little center, build up those gorgeous red petals, and finish it off with a ring of green leaves that anchor the whole design. There's something so satisfying about watching a plain circle transform into a recognizable holiday flower round by round. The petal shaping is simple enough to repeat without losing your place, which makes this a lovely mindless-but-pretty project to work on while watching a movie. I especially love that the leaves are worked separately and added at the end, giving you full control over how full and lush your poinsettia looks. It's endlessly customizable in size and color intensity, so you can make a cluster of mini ones for a wreath or a single show-stopping bloom for your mantel. Best of all, unlike the real flower, this one never drops a petal or needs watering—you can pack it away in January and it'll be just as vibrant next December.
Common mistakes

  • Working the flower center roundPull your starting tail snug before beginning the petal round, and consider working the center stitches slightly tighter than usual to keep the middle compact and hole-free.
  • Not counting stitches carefully inUse a stitch marker at the start of the round and count your stitches before joining so each petal has the same number of stitches for a symmetrical bloom.
  • Attaching the green leaves unevenlySpace your leaf attachment points evenly by eyeballing quarters or eighths around the base circle before securing each leaf with a slip stitch or sewing stitch.
  • Leaving long yarn tails unwovenWeave in ends immediately after finishing each color section using a yarn needle, running the tail through several stitches on the wrong side to keep it secure and invisible.
  • Using a hook size that's too largeMatch your hook size to your yarn weight per the label, and consider sizing down slightly for a firmer, more structured petal that holds its poinsettia shape.
  • Skipping blocking or shaping, leavingLightly steam or pin the finished flower flat once complete to encourage the petals to open and lie in their natural poinsettia shape.

The pattern

Written out round by round

Materials

  • Worsted weight yarn
  • Crochet hook (size to suit your yarn)
  • Yellow yarn (for the flower center)
  • Red yarn (for the petals)
  • Green yarn (for the leaves)
  • Scissors (for cutting yarn)
  • Yarn needle (for weaving in ends)

Abbreviations

  • sc = single crochet
  • hdc = half double crochet
  • dc = double crochet

Step 1: Crochet the Flower Center

Start with Yellow Yarn : Begin with a magic circle or foundation chain of four stitches.

  1. Round 1Work six single crochets (sc) into the magic circle or ring and join with a slip stitch to close the round.Fasten Off: Cut the yarn, leaving a small tail.

Center Tip : You can make the center more realistic by using small popcorn stitches for added texture.

Step 2: Crochet the Red Petals

Attach Red Yarn : Join red yarn to any stitch in the flower center.

Petal Formation :

  1. Round 1Chain five stitches, then work one double crochet (dc) into the second chain from the hook, one half-double crochet (hdc) into the next stitch, and finish with a single crochet (sc).Slip Stitch: Slip stitch back into the flower center to anchor the petal.Repeat: Repeat this petal pattern around the center to create six petals.Fasten Off: Cut the yarn and weave in ends.

Petal Tip : Use two shades of red for a more lifelike look, with a darker red as the base and a lighter red on top.

Step 3: Add Green Leaves

Attach Green Yarn : Join green yarn to the back of the flower center.

Leaf Formation :

  1. Round 1Chain six stitches, work one dc into the second chain from the hook, one half-double crochet (hdc) into the next, followed by two single crochets (sc).Slip Stitch: Slip stitch into the flower center to complete the leaf.Repeat: Make six leaves around the back of the flower.

Optional : Add a second layer of leaves by making another round with larger leaves to add fullness.

Leaf Tip : Block or lightly starch the leaves to help them hold their shape and add structure to the flower.

Important notes

💡 Use a hook one size smaller than the yarn label recommends for a firmer, more structured petal that holds its shape nicely.

💡 Keep a stitch marker on your first stitch of each round so you always know where to join and avoid spiraling.

💡 Block your finished poinsettia by lightly steaming and gently flattening the petals so they fan out realistically instead of curling inward.

💡 If making multiple poinsettias for a wreath or garland, crochet all the centers first, then batch the petals and leaves for efficient assembly.

💡 A dab of fabric glue or a few hidden stitches at the base helps keep the leaves securely attached if they'll see frequent handling as a gift topper.

FAQs

Frequently asked questions

What yarn weight works best for this crochet poinsettia?

Worsted weight yarn is ideal for a standard-sized bloom with good stitch definition. You can go finer for a dainty ornament-sized flower or bulkier for a statement piece, just adjust your hook size to match.

How many petals does this pattern make?

The pattern works the red petals in a single round from the flower center, creating a full, layered petal effect typical of a poinsettia bloom. You can repeat the petal round technique to add extra layers if you want an even fuller flower.

Can I make this poinsettia without sewing the leaves on separately?

Yes, some crocheters prefer to slip stitch the leaves directly onto the base round instead of sewing them on afterward. Either method works well; just make sure the leaves are evenly spaced for a balanced look.

What's the best way to stiffen the petals so they hold their shape?

Light steam blocking or a fabric stiffener spray both work well for keeping the petals from curling. Pin the flower flat while it dries for the crispest, most realistic poinsettia shape.

Can this poinsettia flower be attached to other projects like hats or wreaths?

Absolutely, this flower is designed to be a versatile embellishment. Simply sew it onto a hat, wreath, garland, or gift wrap using the yarn tail left at the base for a quick, secure attachment.

One at a time —

Get the next pattern

Tested round by round before it is sent. No spam.