Made and counted by Wren —

Crochet Happy-Flower Decoration: A Cheerful Burst of Color

Learn to crochet a happy-flower decoration with this beginner-friendly pattern featuring a colorful layered center and petals worked in easy rounds.

BeginnerLevel
1-2 HoursTime
WorstedYarn
Jump to the pattern

At a glance

Start with a magic ring and crochet 6 single crochets into it to form the very center of the flower.

Work round 2, increasing with 2 sc in each stitch around for 12 sc total.

Work round 3, alternating 1 sc and 2 sc around for 18 sc total, then fasten off and weave in ends.

Attach a bright petal-color yarn to the back loops of the last round of the center.

Chain 4 and slip stitch into the next stitch, repeating all the way around to form a ring of petals.

Optionally attach yarn to the back and repeat the petal steps for a second layer of petals and extra volume.

Fasten off and weave in any loose ends so the finished flower looks tidy on both sides.

Add a bead, button, or embroidered detail to the center, then display or attach your cheerful flower as you like.

About this pattern

This happy-flower decoration is exactly what it sounds like — a bright, cheerful little bloom that instantly lifts the mood of any space it lands in. Built around a colorful layered center and petals, it's the kind of project that proves crochet doesn't need to be complicated to be delightful. Whether you're decorating a nursery, brightening a bookshelf, or looking for a sweet handmade gift, this flower fits the bill perfectly, and its small size means you can whip up a whole garden of them without much yarn or time.

The heart of this pattern is the three-round center, worked in the round using basic increase techniques to build a nicely domed, textured shape, followed by a ring of simple chain-and-slip-stitch petals attached around the outer edge. It's an approachable project for beginners who've mastered single crochet and want to practice working in rounds, while more experienced crocheters will enjoy how quickly it comes together as a mindless, relaxing make. Expect to spend under an hour on the whole flower, making this an ideal project for an evening on the couch or a quick weekend craft session.

Once finished, you'll have a compact, dimensional flower with a soft, tactile texture and a playful, sunny personality that lives up to its 'happy' name. It's small enough to embellish a hairclip, pin, or bag, yet charming enough to stand alone as a little shelf decoration. Made in cheerful colors, it also makes a wonderful quick gift — pop a few into a card or a small box and you've got a handmade surprise that costs little but means a lot.

Variations

The beauty of this happy-flower is how endlessly customizable it is with just a few tweaks. Experiment with different color schemes for the petals and center — you can make rainbow flowers, monochromatic flowers, or stick to seasonal colors like pastels for spring or deep reds and oranges for fall. Use a smaller hook for tiny flowers or a larger hook for oversized, bold blooms. Try using different crochet stitches such as half double crochet (HDC) or double crochet (DC) for the petals to create different textures and looks. For a fuller look, create multiple layers of petals by working a second round of petals, building them up for a 3D effect. However you customize it, this little flower is a fantastic canvas for trying new color combinations and stitch types without much investment.

I adore this pattern because it takes something as simple as three rounds of single crochet plus a ring of chain petals and turns it into a genuinely joyful little object. There's something so satisfying about watching the center build up round by round, each one adding a bit more dimension and personality to the piece, before the petals unfurl around the edge. It's the kind of quick, low-commitment project I reach for when I want to feel productive without diving into a multi-day amigurumi. I also love how forgiving it is — even if your tension varies a little, the finished flower still looks charming and handmade in the best way. It's a fantastic stash-buster too, since you only need small amounts of yarn in bright, happy colors to make it pop. Plus, because the pattern is worked in the round from the start, there's no seaming to fuss over, which means more time enjoying your finished flower and less time finishing edges. Whether you make one or a dozen, this pattern delivers big cheerfulness for a small amount of effort — exactly what I want from a feel-good crochet project.
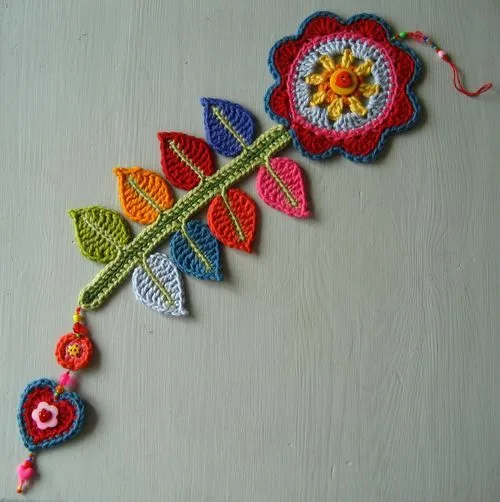
Common mistakes

  • Losing track of stitch count during the increase roundsPlace a stitch marker at the start of each round and count your stitches before moving to the next round to make sure your increases landed correctly.
  • Starting the center with a loose magic ringPull the tail firmly after your first round of stitches to close the ring tightly so there's no visible hole at the center of the flower.
  • Working too tightly and curling the centerIf your rounds start to cup inward instead of lying flat or domed as intended, size up your hook slightly to loosen your tension.
  • Not distributing increases evenly around the roundSpace your increase stitches evenly rather than clustering them together so the flower center grows in a smooth, circular shape instead of a lopsided one.
  • Leaving too short a yarn tail for finishingLeave at least a 6-inch tail at the end of round three so you have enough length to weave in securely or attach the piece to a project.
  • Skipping a join marker between roundsUse a contrasting scrap of yarn or a locking stitch marker at the join point of each round so you always know exactly where a new round begins.

The pattern

Written out round by round

Materials

  • Worsted weight yarn in your chosen colors (e.g., yellow for the center, a bright color for the petals)
  • Crochet hook (size to suit your yarn)
  • Yarn needle (for weaving in ends)

Abbreviations

  • sc = single crochet
  • ss = slip stitch
  • hdc = half double crochet
  • dc = double crochet

1. Crochet the Center of the Flower

Start with a Magic Ring : Using your chosen yarn color for the center (typically yellow), create a magic ring.

  1. Round 1Single Crochet: Crochet 6 single crochets (SC) into the magic ring and pull tight to close.
  2. Round 2Increase: In this round, you’ll increase by crocheting 2 SC in each stitch around (12 SC total).(12)
  3. Round 3Continue Increasing: In this round, crochet 1 SC in the first stitch, followed by 2 SC in the next stitch. Repeat this pattern all the way around (18 SC total).Fasten Off: After finishing the center, fasten off and weave in the ends using a yarn needle.(18)

2. Create the Petals

Attach Yarn for the Petals : Choose your favorite bright color for the petals. Attach the yarn to the back loops of the last round of the center.

  1. Petal Round 1Start the Petals: Chain 4 stitches , then insert your hook into the next stitch and make a slip stitch (SS) to form the base of the first petal. Build the Petals: Continue by chaining 4 stitches again, inserting your hook into the next stitch, and repeating the slip stitch. Do this all the way around the center to create as many petals as you’d like.
  2. Petal Round 2Round 2 of Petals: Once you have your first layer, you can build a second round of petals on top of the first by attaching the yarn to the back of the center and repeating the petal steps. This will give your flower more volume and layers.Fasten Off: Once your petals are complete, fasten off and weave in any loose ends.

3. Adding Details to Your Flower

Add Beads to the Center : Sew a small bead or button in the center of the flower to give it a cute, polished finish.

Embroider Details : If you’re feeling crafty, embroider small designs on the petals or the center for extra flair.

Use Glitter Yarn : For a more whimsical look, use glitter yarn or yarn with metallic threads to add a touch of sparkle to your petals.

Important notes

💡 Use a hook one size smaller than you normally would for worsted weight yarn to keep your three rounds nice and tight, which helps the flower center hold its shape.

💡 Keep a stitch marker handy for every round change — with only three rounds, it's easy to lose track of where you started without one.

💡 Weave in ends as you finish each round rather than saving them all for last, since the small size of this piece makes tails easy to lose track of.

💡 Block your finished center gently with a light steam or a light misting of water to help it lie flat and even before attaching it to any project.

💡 Test your gauge with a quick swatch of a magic ring plus one round if you're substituting a different yarn weight, so your finished flower size matches your expectations.

FAQs

Frequently asked questions

How much yarn do I need to make this happy-flower?

You'll only need a small amount of worsted weight yarn per color since the piece is just a few rounds of center and petals. A single small skein is more than enough for several flowers.

Is this pattern good for a first-time crocheter?

Yes, this is an excellent beginner project since it only uses basic stitches worked in the round with simple increases and simple chain-and-slip-stitch petals. It's a great way to practice working in continuous rounds without a huge time commitment.

What can I attach this flower to once it's finished?

This little flower works beautifully as an embellishment on hair clips, headbands, bags, or even as a standalone pin. It's also lovely sewn onto a plain crocheted background for wall art or coasters.

Why is my flower center curling instead of lying flat?

This usually means your tension is too tight or you're not increasing enough stitches per round. Try sizing up your hook slightly or double-checking that your increase stitches are evenly spaced.

One at a time —

Get the next pattern

Tested round by round before it is sent. No spam.