Made and counted by Wren —

Cream Strawberry Journal Cover Free Crochet Pattern

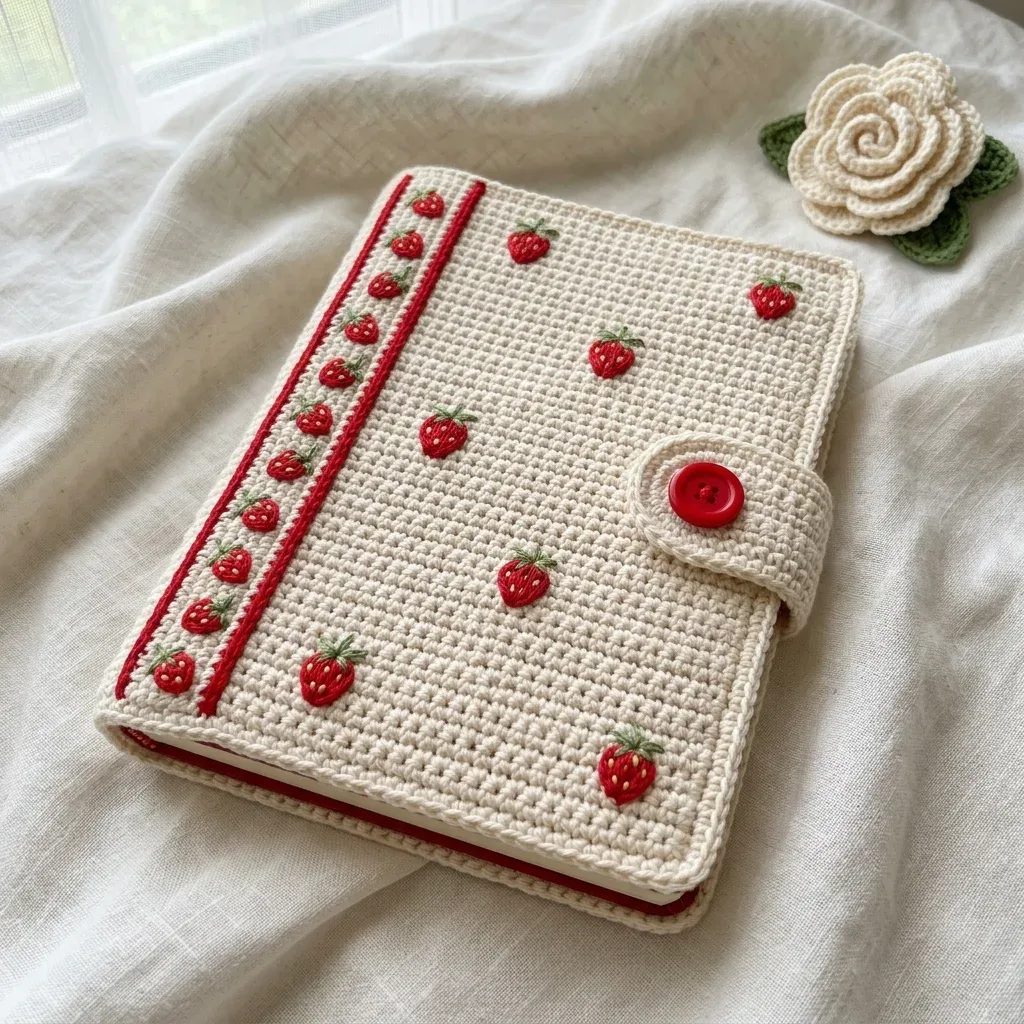
Make a cream crochet journal cover with embroidered strawberries, a red surface-stitch border, pocket flaps, and button closure for A5 journals.

Cream Strawberry Journal Cover Free Crochet Pattern
IntermediateLevel
4-6 HoursTime
4.0 mmHook
WorstedYarn
Jump to the pattern

At a glance

Crochet the main panel flat in single crochet, keeping your stitch count consistent row after row.

Block the finished rectangle to its full width and height before adding any embroidery or embellishments.

Embroider the strawberries onto the cream fabric using simple satin stitches for complete placement control.

Add the raised red border lines along the spine using surface slip stitches worked directly on top of the panel.

Crochet the inner pocket flaps separately, then attach them to the wrong side of the main panel.

Fold the panel around your journal along the marked fold lines to shape the front, back, and spine.

Crochet and attach the button tab closure, then sew on the button to match the loop placement.

Optionally, crochet the rose embellishment and attach it as a removable accent on the finished cover.

About this pattern

This Cream Strawberry Journal Cover is a cozy, fabric-like wrap that turns a plain A5 notebook into something you'll want to show off. Worked in dense single crochet with a cream backdrop, it's finished with hand-embroidered strawberries, a red surface slip stitch border, and a button-and-loop closure. It's perfect for crocheters who love mixing texture with a little embroidery, and for anyone who wants a handmade accessory that feels genuinely special rather than fussy or overworked.

The core technique here is just single crochet, worked flat in one continuous panel, so the stitch pattern itself couldn't be simpler. What makes this an intermediate project is keeping consistent stitch counts across 50 rows, assembling the inner pocket flaps neatly, and adding the satin-stitch strawberries and surface slip stitch spine lines after the panel is done. Plan on a solid weekend, roughly 4 to 6 hours total between crocheting, embroidering, and assembly.

Once blocked and finished, the cover measures about 6.5 by 9 inches closed, sized to snugly wrap a standard A5 journal. The firm, slightly stiff drape (especially gorgeous in cotton) makes it hold its shape beautifully in a bag or on a shelf, while the embroidered strawberries add a charming, personal touch. It's a lovely handmade gift for a journaling friend, a teacher, or yourself.

Variations

This pattern is a fantastic base for personalizing. Swap the cream Main Color for a soft sage green or dusty pink, and suddenly you've got a completely different mood — try pairing sage MC with the same red Color A strawberries for a farmhouse-kitchen feel, or go with a warm terracotta MC and cream berries for an autumn vibe. If strawberries aren't your thing, the satin stitch embroidery technique works beautifully for other small motifs too; simple embroidered daisies, cherries, or even a monogram initial would slot right into the same construction. For yarn, Paintbox Yarns Simply DK held double is a budget-friendly worsted substitute, while Drops Paris or Drops Safran (both cotton) give a firmer, slightly stiffer drape that holds embroidery especially cleanly and resists pilling, ideal if this cover is getting tossed in a bag daily. Wool blends will feel softer but drapier, so stick with cotton or cotton-blend yarns if you want that structured, book-cover stiffness. Sizing up or down is straightforward since the panel is one flat rectangle: for a larger journal, add rows to the 50-row main panel in multiples of 2 to keep your row gauge even, and recalculate your fold lines proportionally based on your journal's actual width and height compared to the A5 dimensions given here. For a smaller pocket-sized notebook, subtract rows in the same way and shorten the pocket flap rounds to match. You could also skip the button closure and add crocheted ties instead, or leave off the optional rose and add a small embroidered leaf sprig instead for a more minimalist finish.

I adore how this pattern lets you fake complexity without actually dealing with colorwork. The whole panel is just single crochet, row after row, so your hands can go on autopilot while you watch something in the background — but the finished look reads as so much more intricate than it actually is. The strawberries are embroidered on afterward with simple satin stitches, which means you get complete control over exactly where they land, no counting stitches mid-round or juggling bobbins. Same goes for those red corded lines running along the spine; surface slip stitch gives you that graphic, raised detail without ever breaking your rhythm during construction. I also love that the button tab closure and optional crochet rose feel like little bonus projects tucked inside a bigger one. By the time you fold your panel around your journal and tuck the pocket flaps into place, it genuinely feels like you made something a boutique would sell. It's satisfying from start to finish, and it's endlessly giftable.
Common mistakes

  • Losing count of single crochet stitches across the 50-row main panel, resulting in a wavy or tapered rectangle instead of a straight one.Place a stitch marker at the start and end of every row, and count stitches before starting the next row. Catching a mistake within one row is far easier than unpicking multiple rows later.
  • Embroidering the strawberries using a loose or uneven tension with the satin stitch, causing gaps that show the cream background fabric underneath.Work satin stitches closely together with consistent tension, and use a firmly worked cotton or worsted yarn for Color A so the stitches sit neatly on top of the dense single crochet base.
  • Working the surface slip stitch border too tightly, which puckers and distorts the flat panel along the spine.Keep your surface slip stitches relaxed and roughly the same height as your working fabric's stitches; pull up loops evenly rather than cinching them tight against the panel.
  • Folding the panel and attaching the inner pocket flaps without first confirming placement against your actual journal.Before sewing, lay your finished panel flat, fold it around your closed journal, and mark your fold lines with stitch markers or pins to confirm the pocket flaps will land in the right spot.
  • Skipping the stabilizer insert for the spine panel, leaving the cover floppy and prone to sagging over time.Cut thin cardboard or a stabilizer insert to fit the spine area before final assembly, and tuck it into the pocket structure so the cover keeps its shape when the journal is inside.
  • Choosing a stretchy or elastane-blend yarn for the Main Color, which causes the finished cover to lose its firm, book-like structure.Stick with a firm worsted weight cotton or cotton-blend yarn as suggested, and swatch first to confirm your fabric feels sturdy rather than stretchy before starting the full panel.

The pattern

Written out round by round

Materials

  • Main Color (MC): Cream or off-white worsted weight yarn, approximately 280 yards (256 meters)
  • Color A (CA): Red worsted weight yarn, approximately 45 yards (41 meters) for crochet lines and embroidery
  • Color B (CB): Green worsted weight yarn, approximately 8 yards (7 meters) for strawberry leaves
  • Color C (CC): Off-white worsted weight yarn, approximately 15 yards (14 meters) for optional rose embellishment (can be same as MC)
  • Paintbox Yarns Simply DK held double creates a worsted-equivalent weight with exceptional color consistency.
  • Drops Paris or Drops Safran are cotton-based options that give the cover a firm, slightly stiff drape. Cotton holds embroidery cleanly and doesn’t pill, making it ideal for this type of project.
  • US size G-6 / 4.0 mm crochet hook
  • Tapestry needle for embroidery and weaving ends
  • One red button, approximately 0.75 inch (19 mm) diameter
  • At least 4 stitch markers
  • Scissors
  • Straight pins for blocking

Optional

  • thin cardboard or stabilizer insert for spine panel

Abbreviations

  • ch = chain
  • sc = single crochet (insert hook, yarn over, pull up loop, yarn over, pull through both loops)
  • sl st = slip stitch
  • st/sts = stitch/stitches
  • sp = space
  • sk = skip
  • BLO = back loop only
  • RS = right side
  • WS = wrong side
  • rep = repeat
  • rem = remaining
  • MC = main color (cream)
  • CA = color A (red)
  • CB = color B (green)
  • CC = color C (off-white)

Section 1: Main Panel

The main panel covers all three sections at once: back panel, spine, and front panel. No seams across the main fabric.

At gauge, your stitch breakdown is: Back panel width: 32 stitches Spine width: 5 stitches Front panel width: 33 stitches

Total: 70 stitches With MC and US G-6 / 4.0 mm hook, ch 71.

  1. Round 1(RS): Sc in second ch from hook and in each ch across. (70 sc)
  2. Round 2Ch 1, turn. Sc in each st across. (70 sc)
  3. Round 3through 37: Ch 1, turn. Sc in each st across. (70 sc per row) Checkpoint: After Row 37, your panel should measure approximately 6.5 to 7 inches tall and 14 inches wide. The fabric should be firm and even.
  4. Round 38through 50: Ch 1, turn. Sc in each st across. (70 sc per row) After Row 50, the main panel is complete.Fasten off MC. Weave in ends.

Final Checkpoint: Your completed main panel should measure approximately 14 inches wide and 9 inches tall. It should be a true rectangle with square corners.

Section 3: Inner Pocket Flaps

These create the sleeves that hold your journal covers in place. Make 2.

Each pocket flap measures 2.5 inches tall by 6.5 inches wide after folding.

Pocket Flap (make 2): With MC, ch 33.

  1. Round 1Sc in second ch from hook and in each ch across. (32 sc)
  2. Round 2through 28: Ch 1, turn. Sc in each st across. (32 sc per row) Fasten off after Row 28, leaving a tail of approximately 18 inches for seaming.Fold each pocket flap in half lengthwise (bringing the foundation chain edge up to meet the last row edge). The folded piece is now approximately 2.5 inches tall with a clean folded edge at the top.Align one folded pocket flap against the WS of the back panel section. The folded top edge should sit approximately 0.5 inch below the top raw edge of the main panel. Pin in place.Using MC and a tapestry needle, whip stitch along the left side edge, right side edge, and bottom raw edge of the pocket flap to the main panel WS. Leave the top folded edge open to form the pocket opening.Repeat for the second pocket flap on the front panel section.Test Fit: Fold the main panel around your journal. The journal covers should slide into each pocket flap smoothly.

The completed pocket flap measures approximately 6.5 inches wide and 5 inches tall before folding.

Attaching Pocket Flaps:

Section 4: Button Tab Closure

With MC, ch 16.

  1. Round 1Sc in second ch from hook and in each ch across. (15 sc)
  2. Round 2Ch 1, turn. Sc across. (15 sc)
  3. Round 3Ch 1, turn. Sc in first 6 sts, ch 3, sk 3 sts, sc in last 6 sts. (12 sc, 1 ch-3 sp)
  4. Round 4Ch 1, turn. Sc in first 6 sts, 3 sc in ch-3 sp, sc in last 6 sts. (15 sc)
  5. Round 5Ch 1, turn. Sc across. (15 sc) Fasten off leaving a 12 inch tail. Border the tab: With CA, join at any corner. Work sc around entire perimeter, working 3 sc in each corner to keep it flat. Sl st to join. Fasten off CA.Fold the tab in half lengthwise so it’s doubled for thickness. Whip stitch the long edges together using MC.Attach the tab to the right edge of the front panel at vertical center (approximately 4.5 inches from the top edge). The tab extends outward so it can wrap around to the back panel.Sew the button to the exterior of the back panel on the right edge at vertical center, approximately 0.5 inch from the right raw edge. Position it so the ch-3 loop reaches over it when closed.

Section 8: Optional Rose Embellishment

Rose: With CC, ch 31.

  1. Round 1Sc in second ch from hook and in each ch across. (30 sc)
  2. Round 2Ch 1, turn. Work 2 sc in each st across. (60 sc)
  3. Round 3Ch 1, turn. Work 1 sc in first st, then alternating: sl st in next st, sc in next st, across to end. (60 sts)Fasten off leaving a long tail. Roll the strip into a spiral with RS facing outward. Use the tail to stitch the base together as you roll.With CB, ch 9. Sc in second ch from hook, hdc in next ch, dc in next 2 ch, hdc in next ch, sc in next ch, sl st in last ch. Ch 1, rotate to work along the opposite side. Sl st in first ch, sc in next, hdc in next, dc in next 2, hdc in next, sc in last. Sl st to beginning to close. Fasten off.Attach the leaf to the rose base. This piece can be pinned to the cover as a removable accessory.

Leaf:

Section 2: Fold Lines at Spine

The spine fold lines sit at stitch columns 32 and 38, counting from the right edge when RS faces you. After blocking, lightly crease these fold lines by folding the panel gently over a ruler or the journal spine. This helps the cover wrap cleanly.

Section 6: Surface Stitch Red Border Lines

The spine column spans stitches 33 through 37. The red border lines sit at columns 33 and 35.

First red line: Using CA and your crochet hook, work a surface slip stitch line from the bottom edge to the top edge along stitch column 33.

Second red line: Work a second surface slip stitch line along stitch column 35.

Fasten off all CA ends and weave securely to WS.

Section 7: Strawberry Embroidery

Spine Column Strawberries: Work strawberries in a straight vertical line centered within the spine column at stitch column 35. Work one strawberry every 2 rows, beginning at Row 3 from the bottom and ending at Row 3 from the top. This yields approximately 22 strawberries along the spine column.

Front Panel Scattered Strawberries: Work 9 to 11 additional strawberries scattered across the front panel in loose random placement. Suggested positions measured from the bottom-left corner of the front panel:

1.5 inches from right edge, 1 inch from top 3.5 inches from right edge, 2.5 inches from top 1 inch from right edge, 3.5 inches from top

4.5 inches from right edge, 5 inches from top 2 inches from right edge, 5.5 inches from top 0.8 inches from right edge, 7 inches from top

3 inches from right edge, 7.5 inches from top 1.5 inches from right edge, 8.2 inches from top 4 inches from right edge, 1 inch from bottom

Feel free to adjust. The placement should feel organic, not gridded.

Spine Column Side Strawberries: Work an additional 8 to 10 strawberries along the inner edge of the red border lines, alternating sides.

Assembly

Step 1

Wet blocking is recommended, especially for cotton yarn. Soak the completed cover in cool water for 10 to 15 minutes. Gently press out excess water without wringing. Lay flat on a blocking mat and pin to dimensions. Allow to dry completely.

Step 2

For acrylic yarn, steam blocking works well. Hold a steam iron 1 inch above the fabric without touching, steam gently, then pin to shape and let cool.

Step 3

Weave all yarn tails at least 1 inch through the WS fabric in multiple directions. This cover will be handled frequently, so secure those ends well.

Important notes

💡 Use a US size G-6 / 4.0 mm hook and check your gauge against 20 sc and 22 rows over 4 inches before diving into the full 50-row panel — a slightly smaller hook keeps this fabric dense and book-cover firm.

💡 Place stitch markers at both edges of your row every few rows, not just at the start, so you can spot a miscount within a single row instead of several rows later.

💡 Save your Color A yarn generously; you'll need it both for the surface slip stitch spine border and the strawberry embroidery, so don't run your red skein down to scraps during construction.

💡 Block your finished panel flat and pin it to the correct 14 by 9 inch pre-fold measurements before adding embroidery, since a blocked, even surface makes satin stitching much easier to control.

💡 Add the strawberry embroidery and surface slip stitch border before folding and assembling the pocket flaps, so you're working on a flat, easy-to-handle piece rather than a bulkier finished cover.

💡 Cut your cardboard or stabilizer insert slightly smaller than your spine panel measurement so it doesn't peek out or create hard edges once tucked inside the finished cover.

FAQs

Frequently asked questions

What size journal does this cover fit?

It's designed for a standard A5 journal measuring approximately 5.8 by 8.3 inches. If your journal is a different size, you can adjust the row count and fold lines proportionally to fit.

Do I need to know embroidery to make this pattern?

Just basic satin stitch, which is simply filling in a shape with parallel straight stitches. If you can thread a tapestry needle and stitch back and forth, you can embroider these strawberries.

Can I skip the optional rose embellishment?

Absolutely, the rose is a removable accessory and entirely optional. The cover looks complete and polished with just the strawberries and border, so skip it if you're short on time.

Why is this rated intermediate if it's just single crochet?

The stitch itself is beginner-friendly, but maintaining consistent stitch counts over 50 rows, assembling the pocket flaps, and adding embroidery afterward requires more precision and patience than a simple beginner project.

What yarn works best for a firm, sturdy cover?

Cotton-based yarns like Drops Paris or Drops Safran give the firmest, most structured drape and hold embroidery cleanly. Avoid yarns with high elastane content since stretchy fabric won't hold the cover's shape well.

One at a time —

Get the next pattern

Tested round by round before it is sent. No spam.